
Tracking Costs in Terraform Using Infracost
In my last blog post I introduced a stage which executed Checkov to my Terraform Azure DevOps pipeline. This scanned the Terraform configuration and stopped the deployment if there was an issue. I also added a stage which checks to see if there are any resources being destroyed.
What’s missing?
Both of these I thought should give some basic protection against problems caused by common configuration issues, which they did, but it didn’t take into account the end user, i.e. me, making a change which would dramatically increase the running costs of the deployment.
Enter Infracost
One day as I was skimming through Reddit and I noticed mention of Infracost (I can’t remember the post, sorry) – the description of the tool got my attention. “Cloud cost estimates for Terraform in pull requests” peaked my interest and gave it a go locally.
Installing and registering Infracost locally
As I am a macOS user, installing Infracost locally was a Homebrew command away:
Once installed you need to register for an API key which can be done with a single command:
It will ask you for your name and email address. Once you enter these you should see something like the following output:
*Tip: please make a note of the API key, you will need it later.
That is all of the configuration you need to do, once installed you can try running the tool.
Running Infracost locally
Next up we need some Terraform to run it against. I have some test code which launches a Linux Virtual Machine in Azure so decided to use that.
The Terraform code I am using can be found at the russmckendrick/terraform-vm-local-example Github repo.
To start with run the following:
This will download all of the Terraform providers and create a Terraform Plan file and then convert it to JSON. Next up we can run Infracost against the JSON version of the Terraform Plan file using the following command:
As you can see from the output below (you may need to scroll right), the virtual machine using the SKU Standard_B1ms is going to cost $17.23 per month with an additional cost of around $1.69 for the disk operations:
That’s a reasonable cost, so lets launch the Virtual Machine by running:
Warning – if you are following along with me then running the commands below will incur cost.
Now that we have the Virtual Machine, lets increase the specification by updating the SKU to Standard_B4ms, this can be done in the terraform.tfvars file in the repo. Once updated, generate a new plan file and run Infracost again:
You will notice that when you ran the terraform plan command it checked against the Terraform Statefile, however as you can see from the output below…
…all it shows is the new cost. Wouldn’t it be good if you could figure out the difference? Well you can, just run the following command:
This time I got the output below:
As you can see, here we have an increase in cost of 638% – probably best that I don’t update the SKU!
Now lets look how this can be applied to the Azure DevOps pipeline, but not before I run the following to remove the Virtual Machine:
The Pipeline
The stages of the pipeline are not changing too much, they are still the following
- Checkov Scan, there are no changes to this stage.
- Terraform Validate, there are no changes to this stage.
- Terraform Plan, there is where all of the changes are and we will be covering this stage in more detail below.
- Terraform Apply (Auto Approval), there are no changes to this stage.
- Terraform Apply (Manual Approval), there are some minor changes to this stage, mostly around the wording.
Additional Pipeline variables
There is an addition of a single variable at the top of the azure-pipeline.yml file, this sets the cost_increase_alert_percentage threshold – in my case I set this to 50%:
The second variable which needs to be added contains the API key which you made a note of when the infracost register command was ran locally. If you didn’t make a note then the configuration file created by the command also contains the API key. In my case it was stored at /Users/russ.mckendrick/.config/infracost/credentials.yml.
Open the pipeline in Azure DevOps, click Edit, then Variables and finally add a variable called INFRACOST_API_KEY making sure that you tick the ‘Keep this value secret’ box:
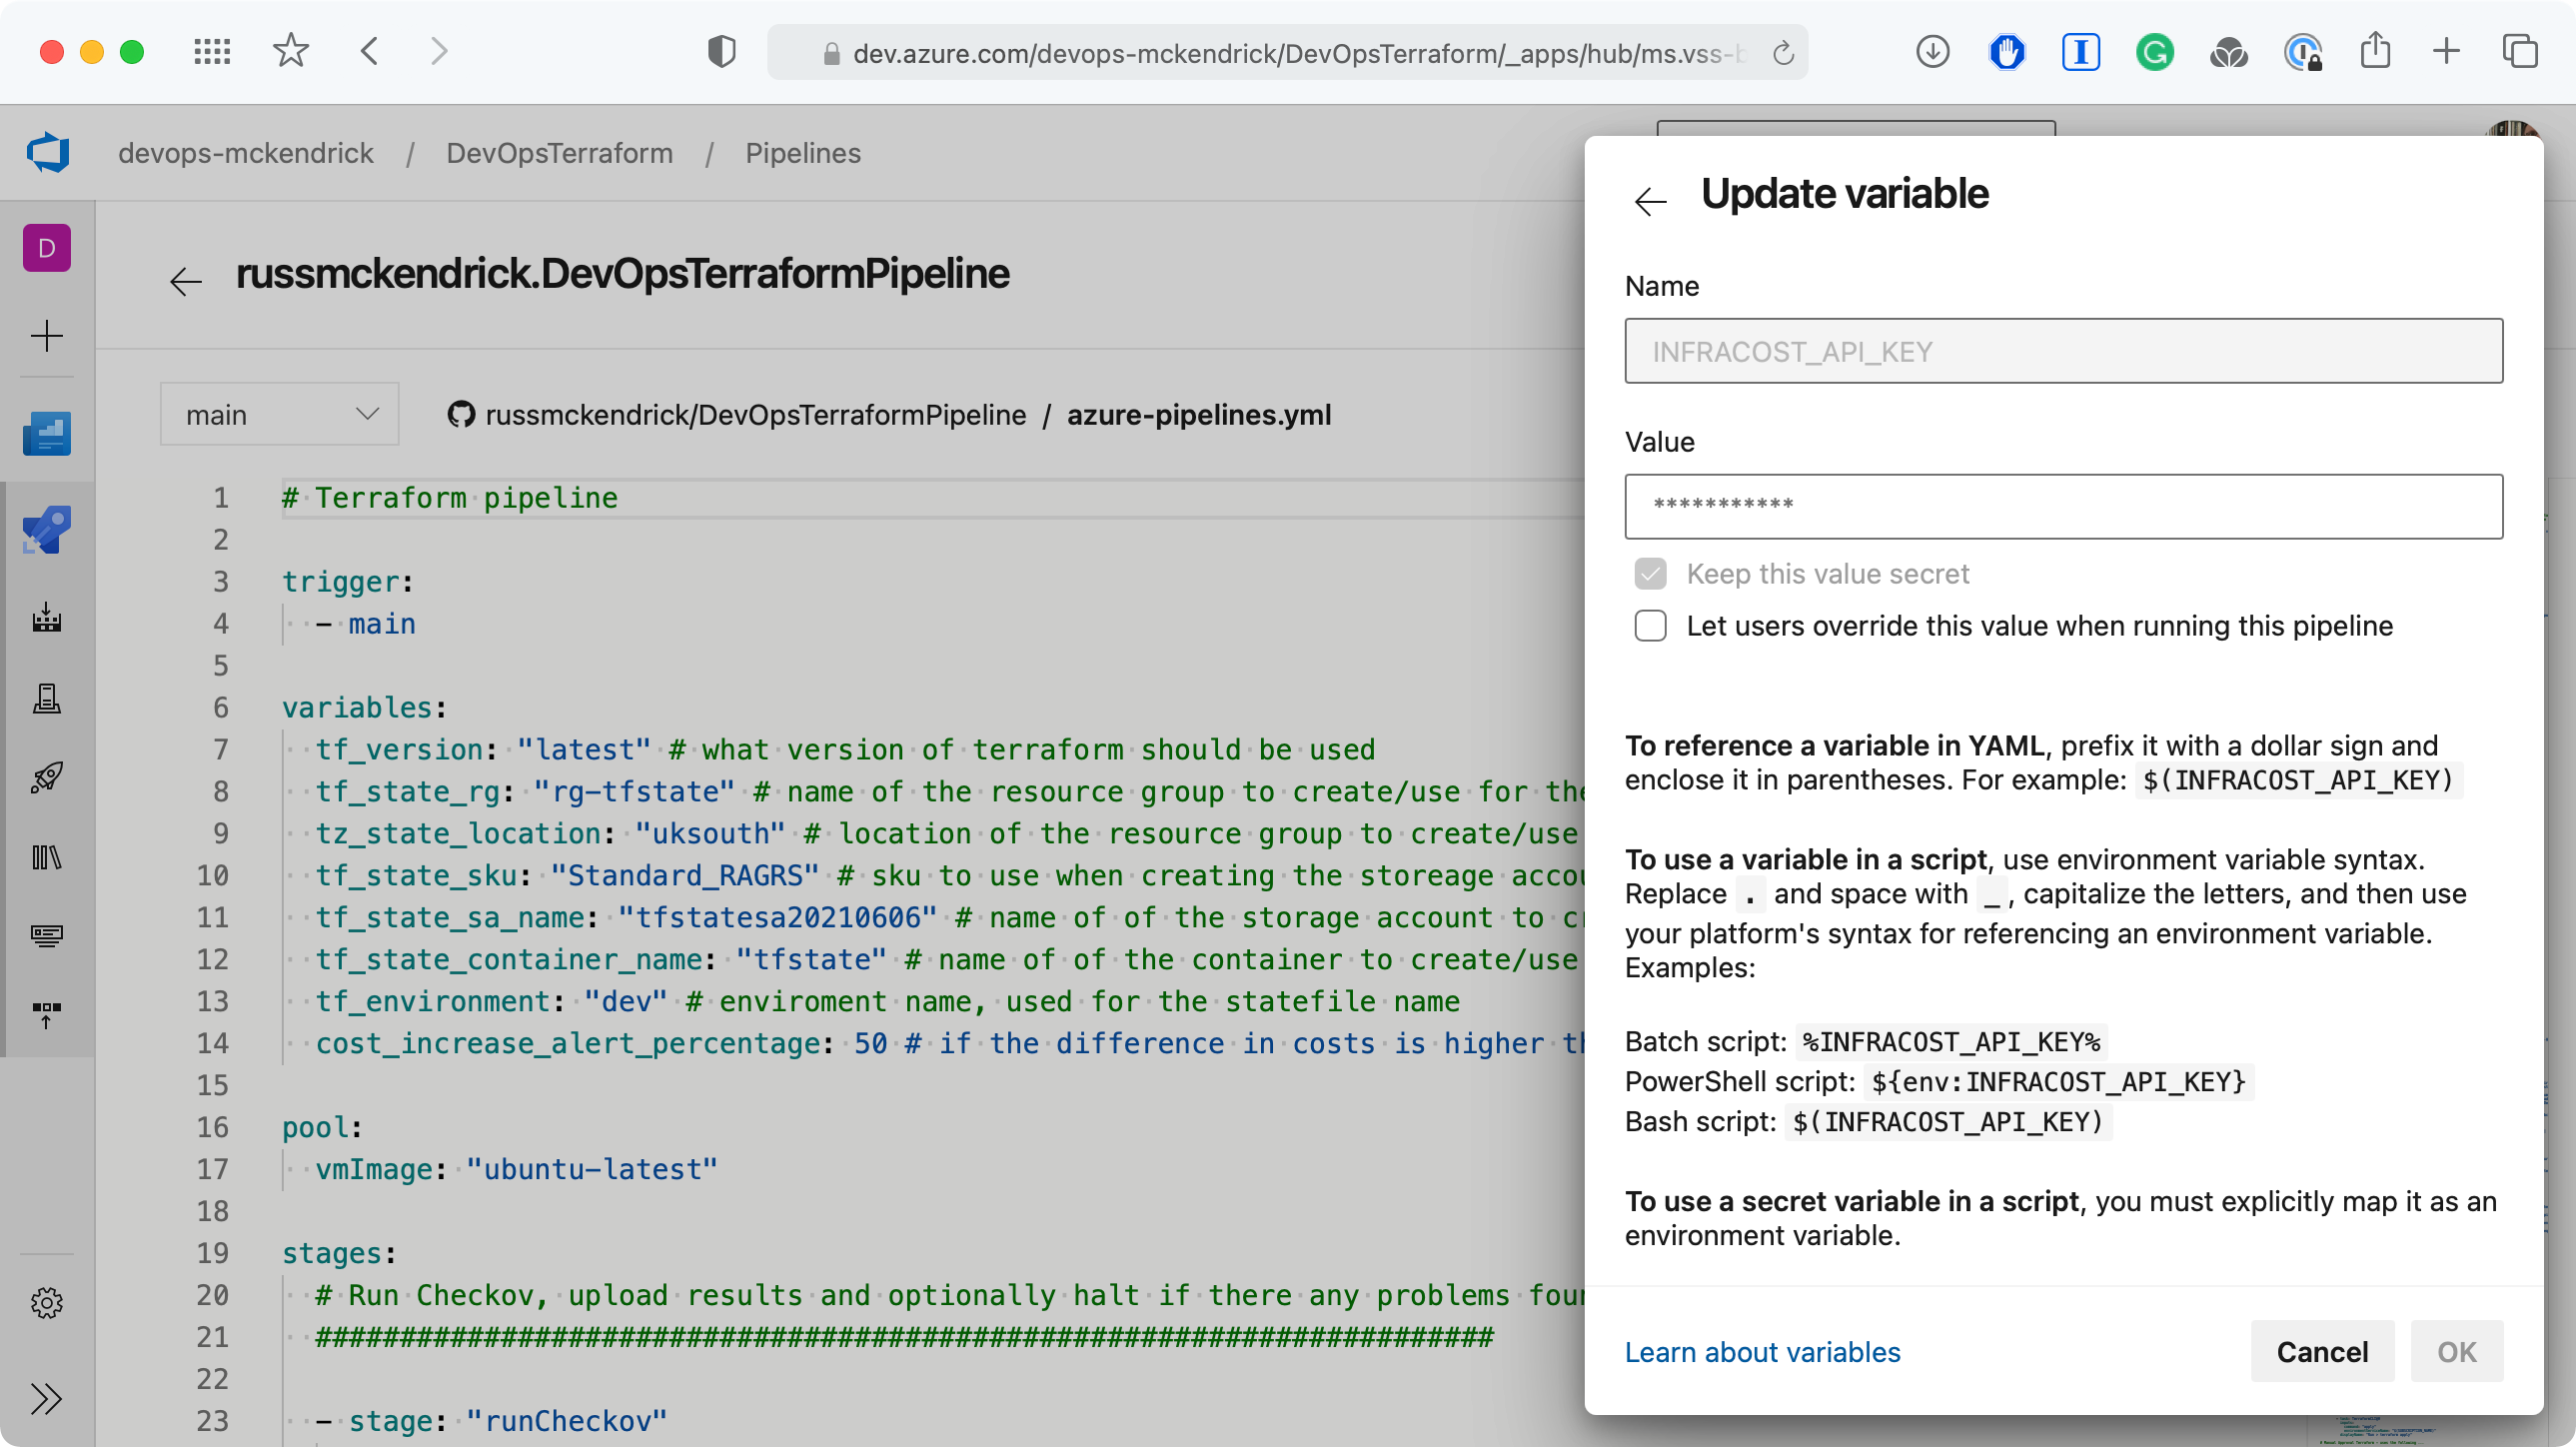
Adding the INFRACOST_API_KEY variable {Source: MediaGlasses}
Now the two variables have been added let’s look at the changes to the pipeline itself.
Stage – Terraform Plan
Before, this stage contained the following tasks:
- “Run > terraform init”
- “Run > terraform plan”
- “Run > terraform show”
There are no changes to these three tasks. By the end of them we are left with an idea of what Terraform is going to do and a Terraform Plan file is stored at $(System.DefaultWorkingDirectory)/terraform.tfplan.
Task – Install > Infracost
The first of the two new tasks we are adding simply installs Infracost:
As you can see, there is a little logic in there which skips this step if the $(INFRACOST_API_KEY) is not defined and we are just left with a message which looks like the following:
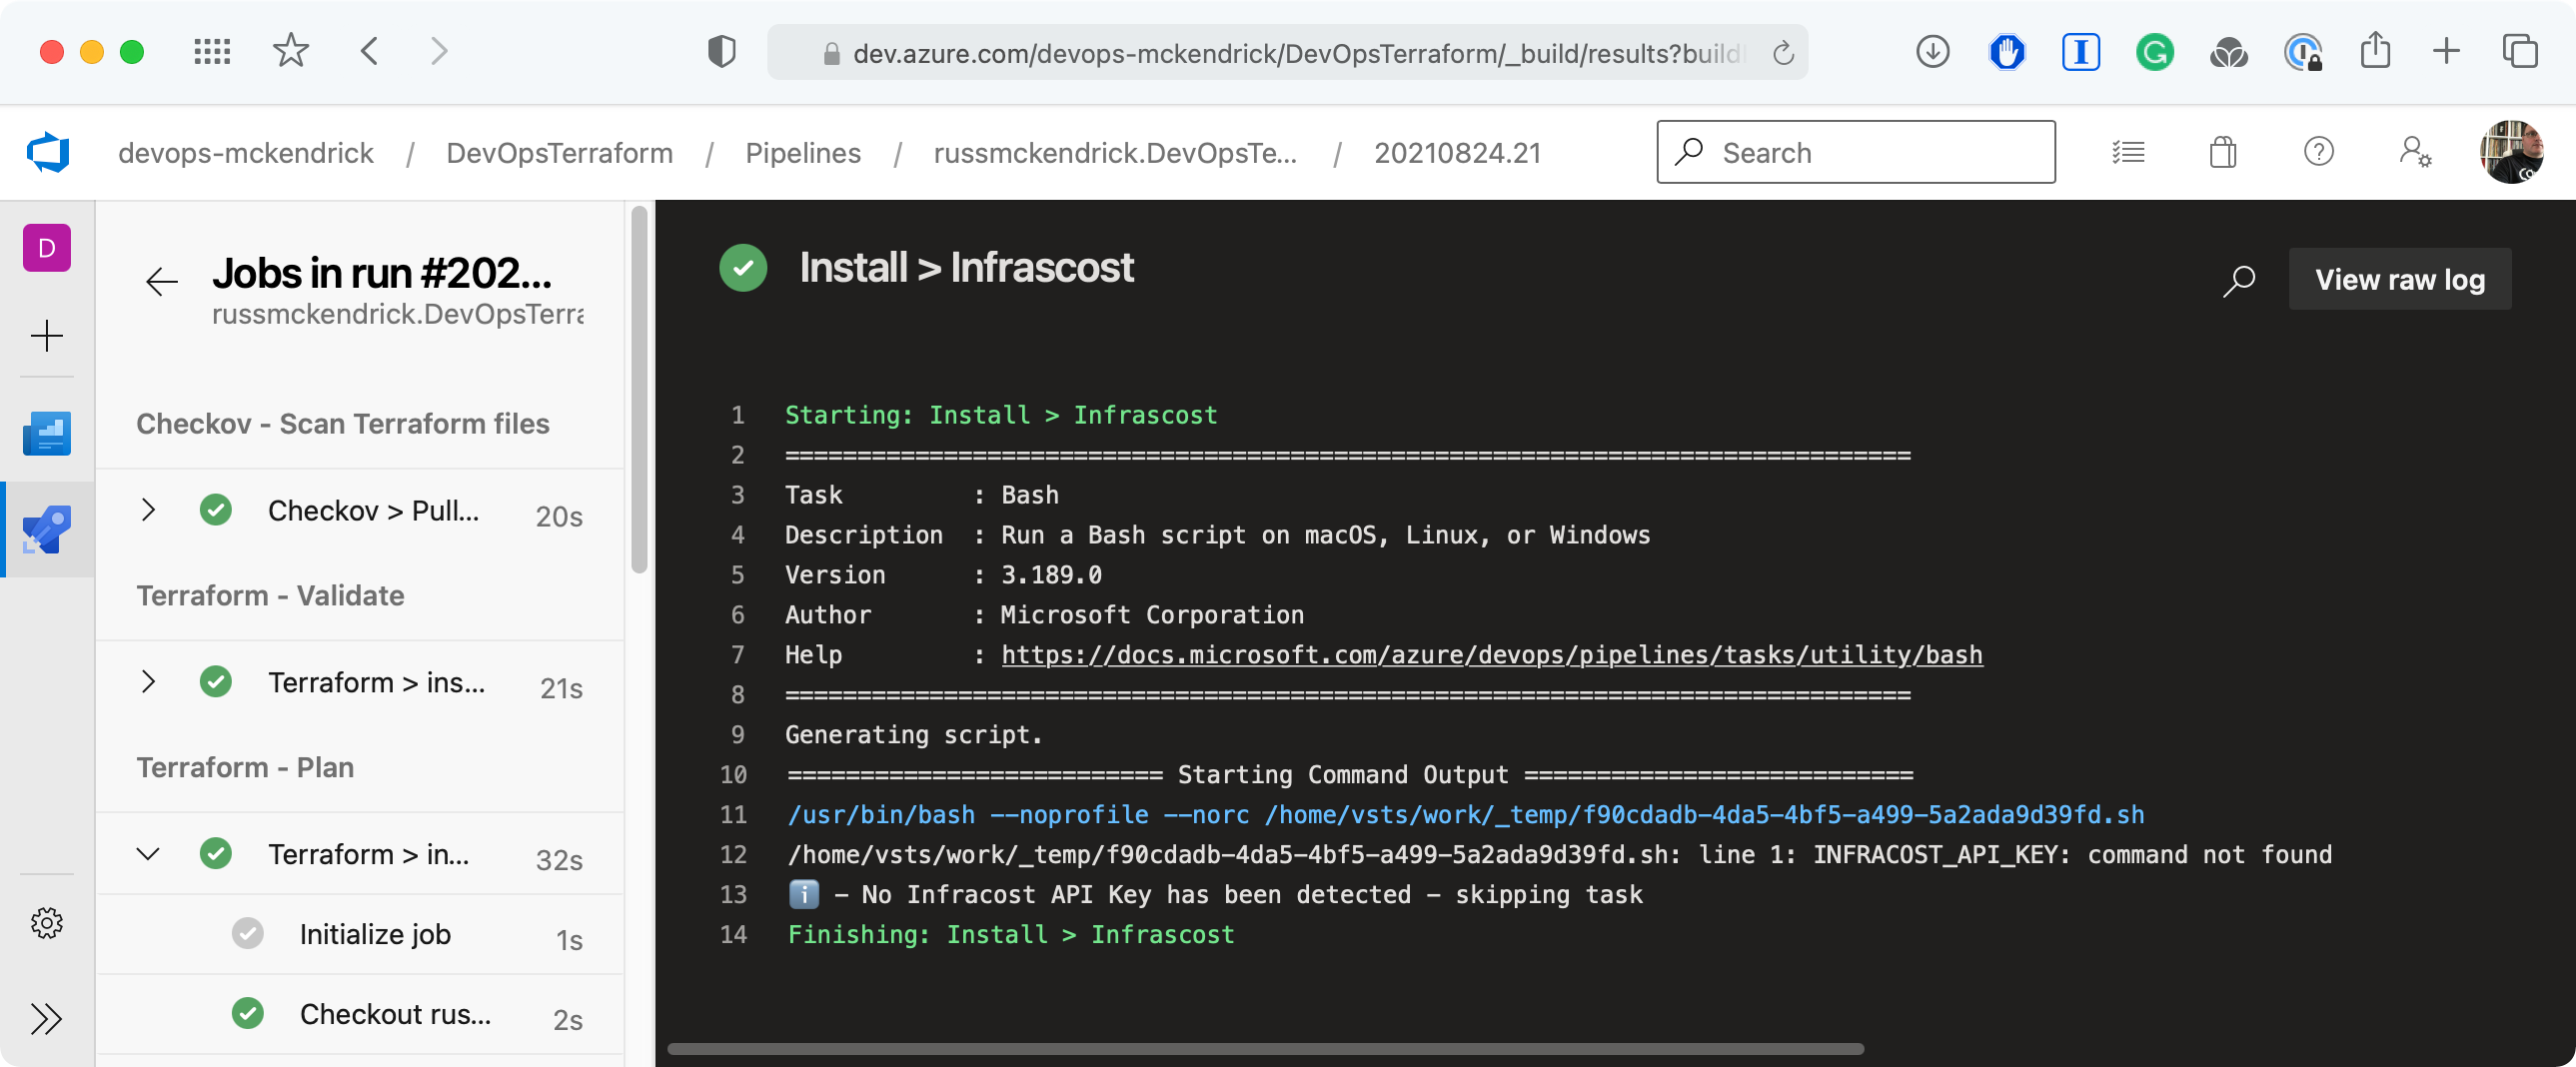
Message that was given when $(INFRACOST_API_KEY) is not defined. Source: MediaGlasses
Once Infracost has been installed we can then run it.
Task – Run > Infracost
There is quite a bit of logic in this task, here it is in its entirety:
The first few of the steps in the task roughly follow what we ran locally:
- Check to see if
$(INFRACOST_API_KEY)has been set - Create a folder called output
- Run
terraform showusing the plan file created by the Run > terraform plan task to save a JSON version of the plan - Take the JSON file created above and run
infracost breakdown, this time outputting the results as a second JSON file
With the only difference being that rather than outputting the screen we are saving the results to a JSON file. Once the file has been generated we can interact with it using the jq command. jq is a lightweight and flexible command-line JSON processor.
First we get the value for the previous cost, if there was one, and assign it to the $past_total_monthly_cost variable:
Then we get the value for the new cost and assign it to the $total_monthly_cost variable:
Next up, we get the difference in cost and set that as the $diff_cost variable:
Now the difference in cost is available to us in the JSON output without the need for us to run the infracost diff command.
Finally, we take the pipeline variable $(cost_increase_alert_percentage) and set a local one called $percentage_threshold:
The next part of the script only runs if both $past_total_monthly_cost and $total_monthly_cost are greater than 0. It sets the percentage increase or decrease based on the data in the variables we have just set which is then exported to the $percent variable.
The next statement sets $percent if there is no cost data:
Now we should have information to make a decision on what the Terraform should do, which should be one of three things;
1. Do nothing, there is no price data to output a message saying that and move on.
2. Check to see if $percent is higher than $percentage_threshold, if so output a message and also set $TERRAFORM_PLAN_HAS_DESTROY_CHANGES to true to trigger the manual review stage.
3. If neither of the conditions above are met then assume that the cost increase is within $percentage_threshold, print a message.
This looks like the following:
The final part of the task closes the loop and also sets the content of $(INFRACOST_API_KEY) as an environment variable called INFRACOST_API_KEY which the infracost checks when it is executed:
Task – Vars > Set Variables for next stage
The final task in this stage is not much different than before, just some of the wording has been tweaked to take into account that we are now looking for cost as well resources being destroyed:
There are also some tweaks to the rest of the pipeline, but nothing outside of changing some of the wording.
Running the Pipeline
Now that we have all of the bits together lets run the same Terraform code which launches a Linux virtual machine with the Standard_B1ms SKU.
Initial Run
When the pipeline is first run there are no existing costs so we get the following output:

First run. Source: MediaGlasses
As you can see, we have a message saying that “No previous cost data has been detected” and that Terraform has just run as expected as it is only adding resources.
Running again
Rerunning with the same SKU gives us the following:
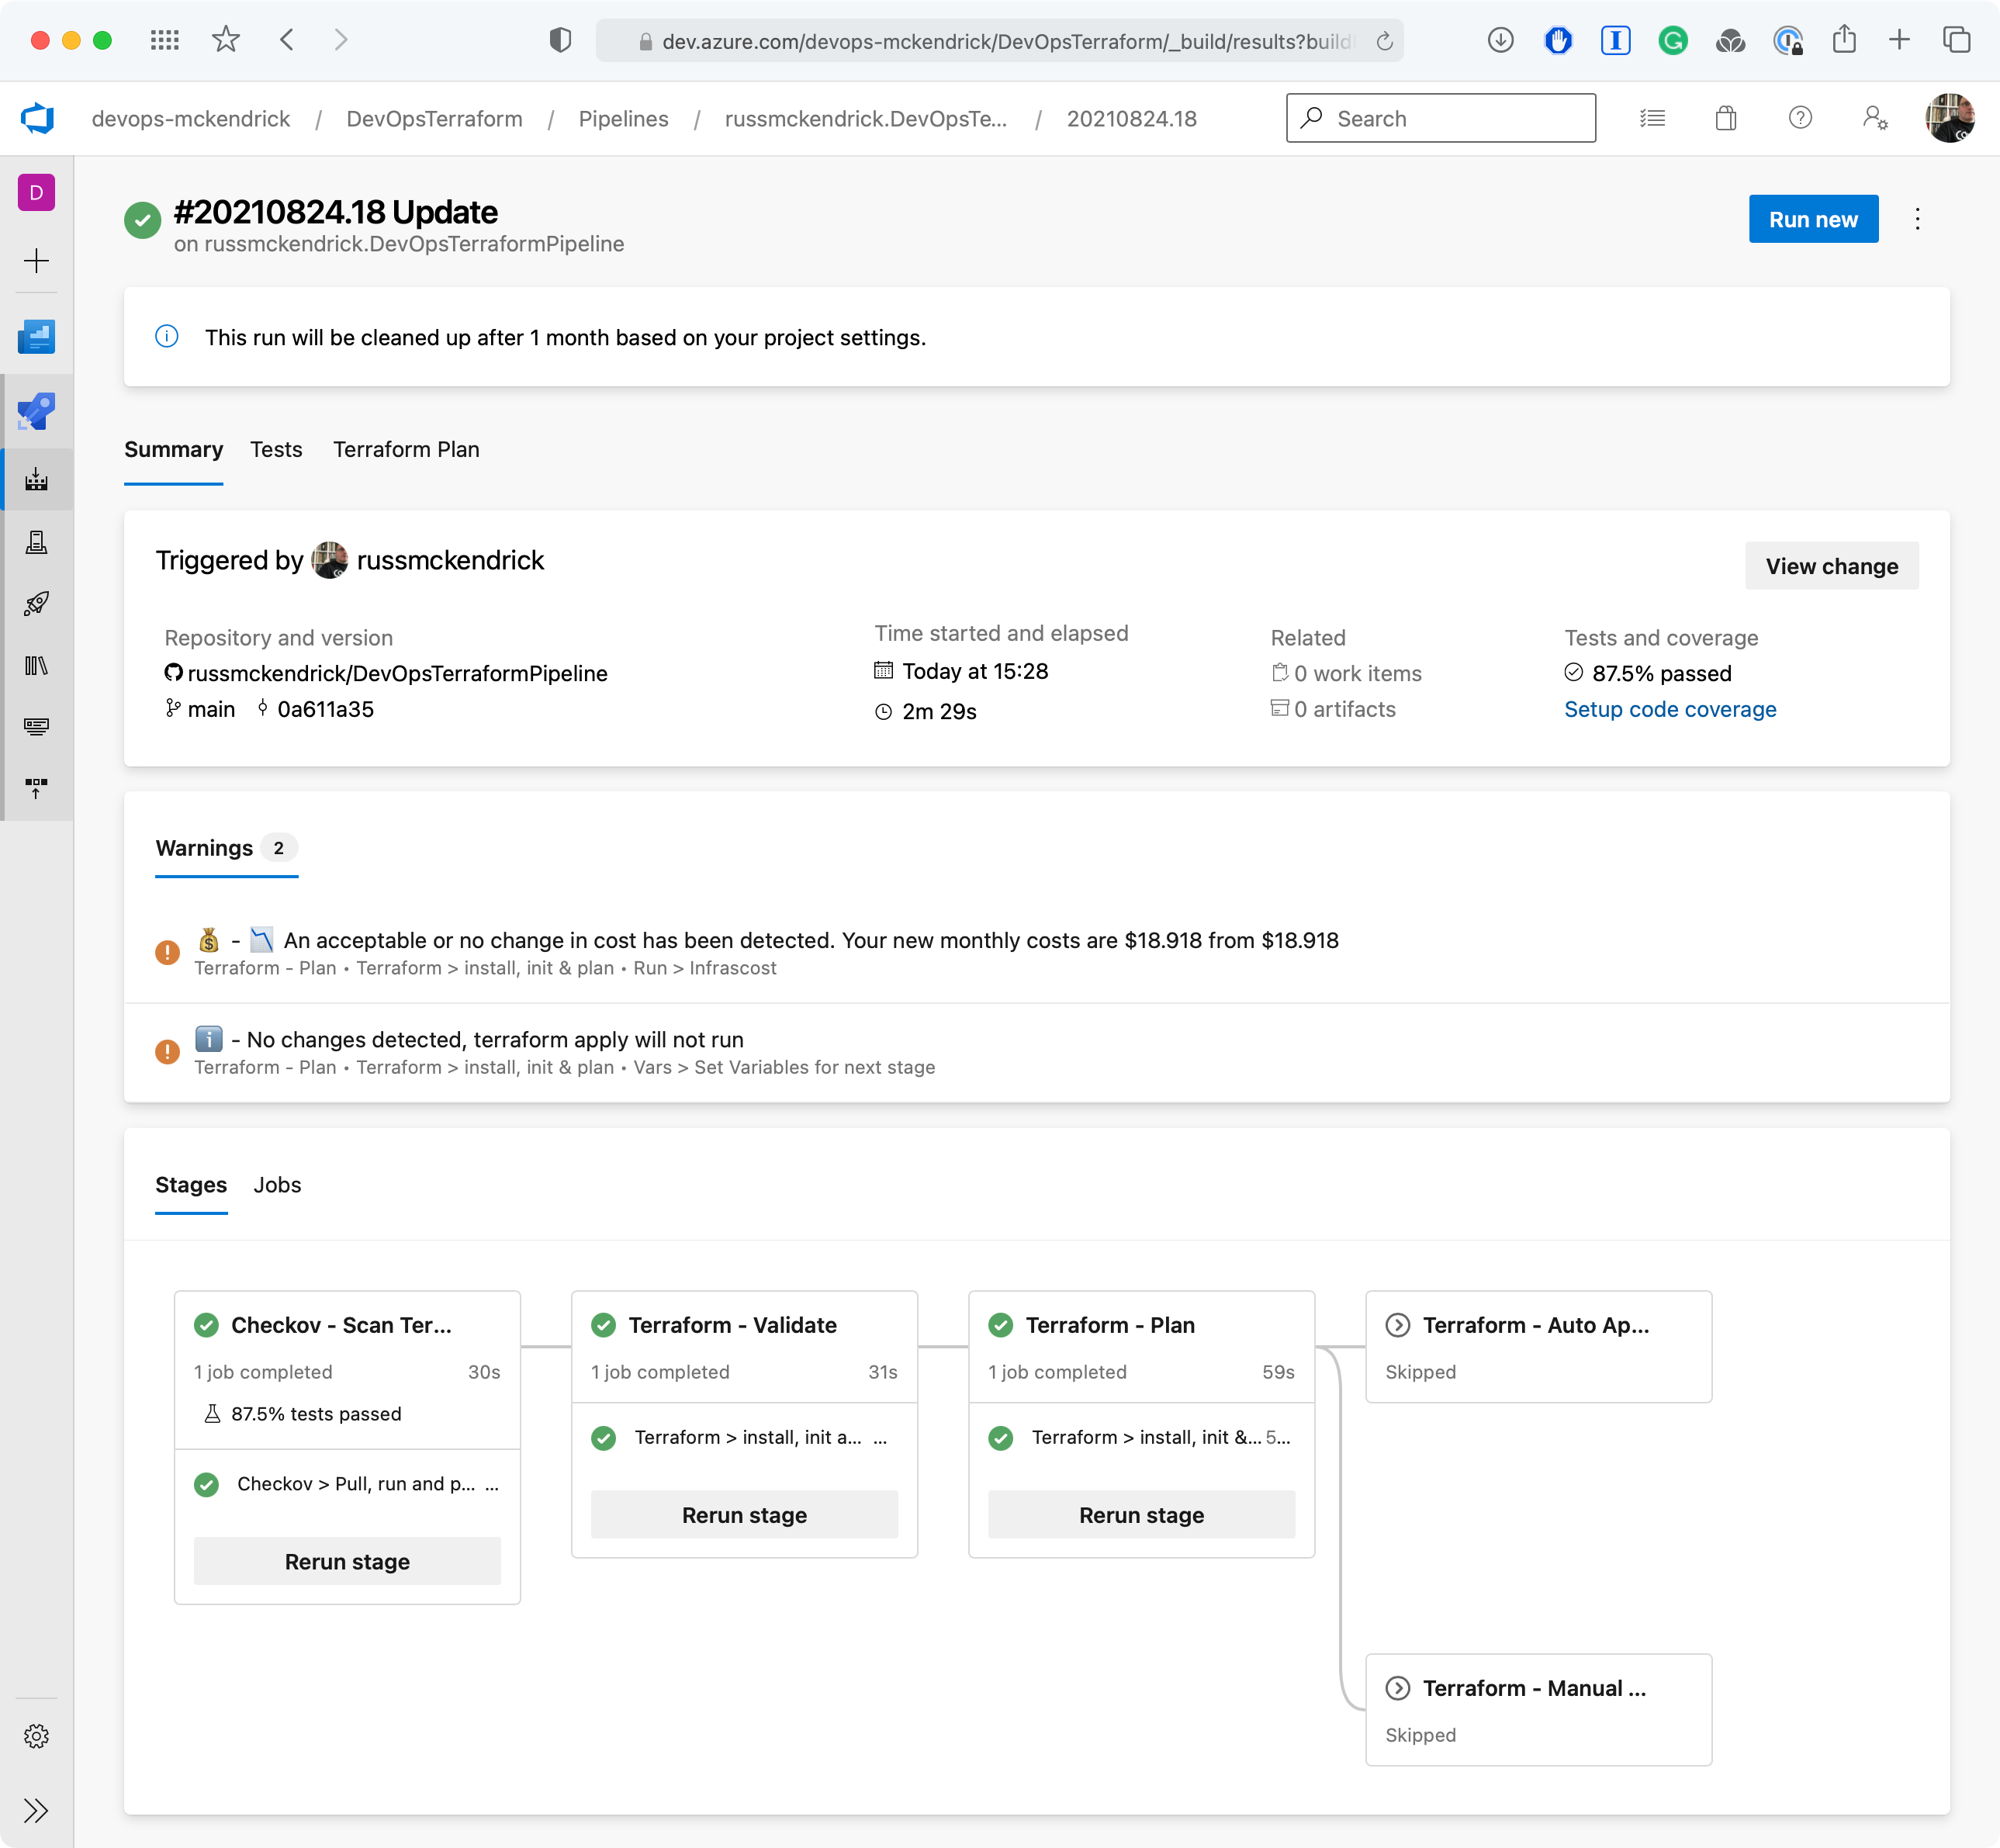
Second run. Source: MediaGlasses
As we already have an existing resource Infracost returns information on both the previous and new cost, which in our case was $18.91 – also note that as there are no changes Terraform does not attempt to apply any thing.
Updating the SKU and increasing costs
Now let’s bump the SKU to Standard_B4ms:
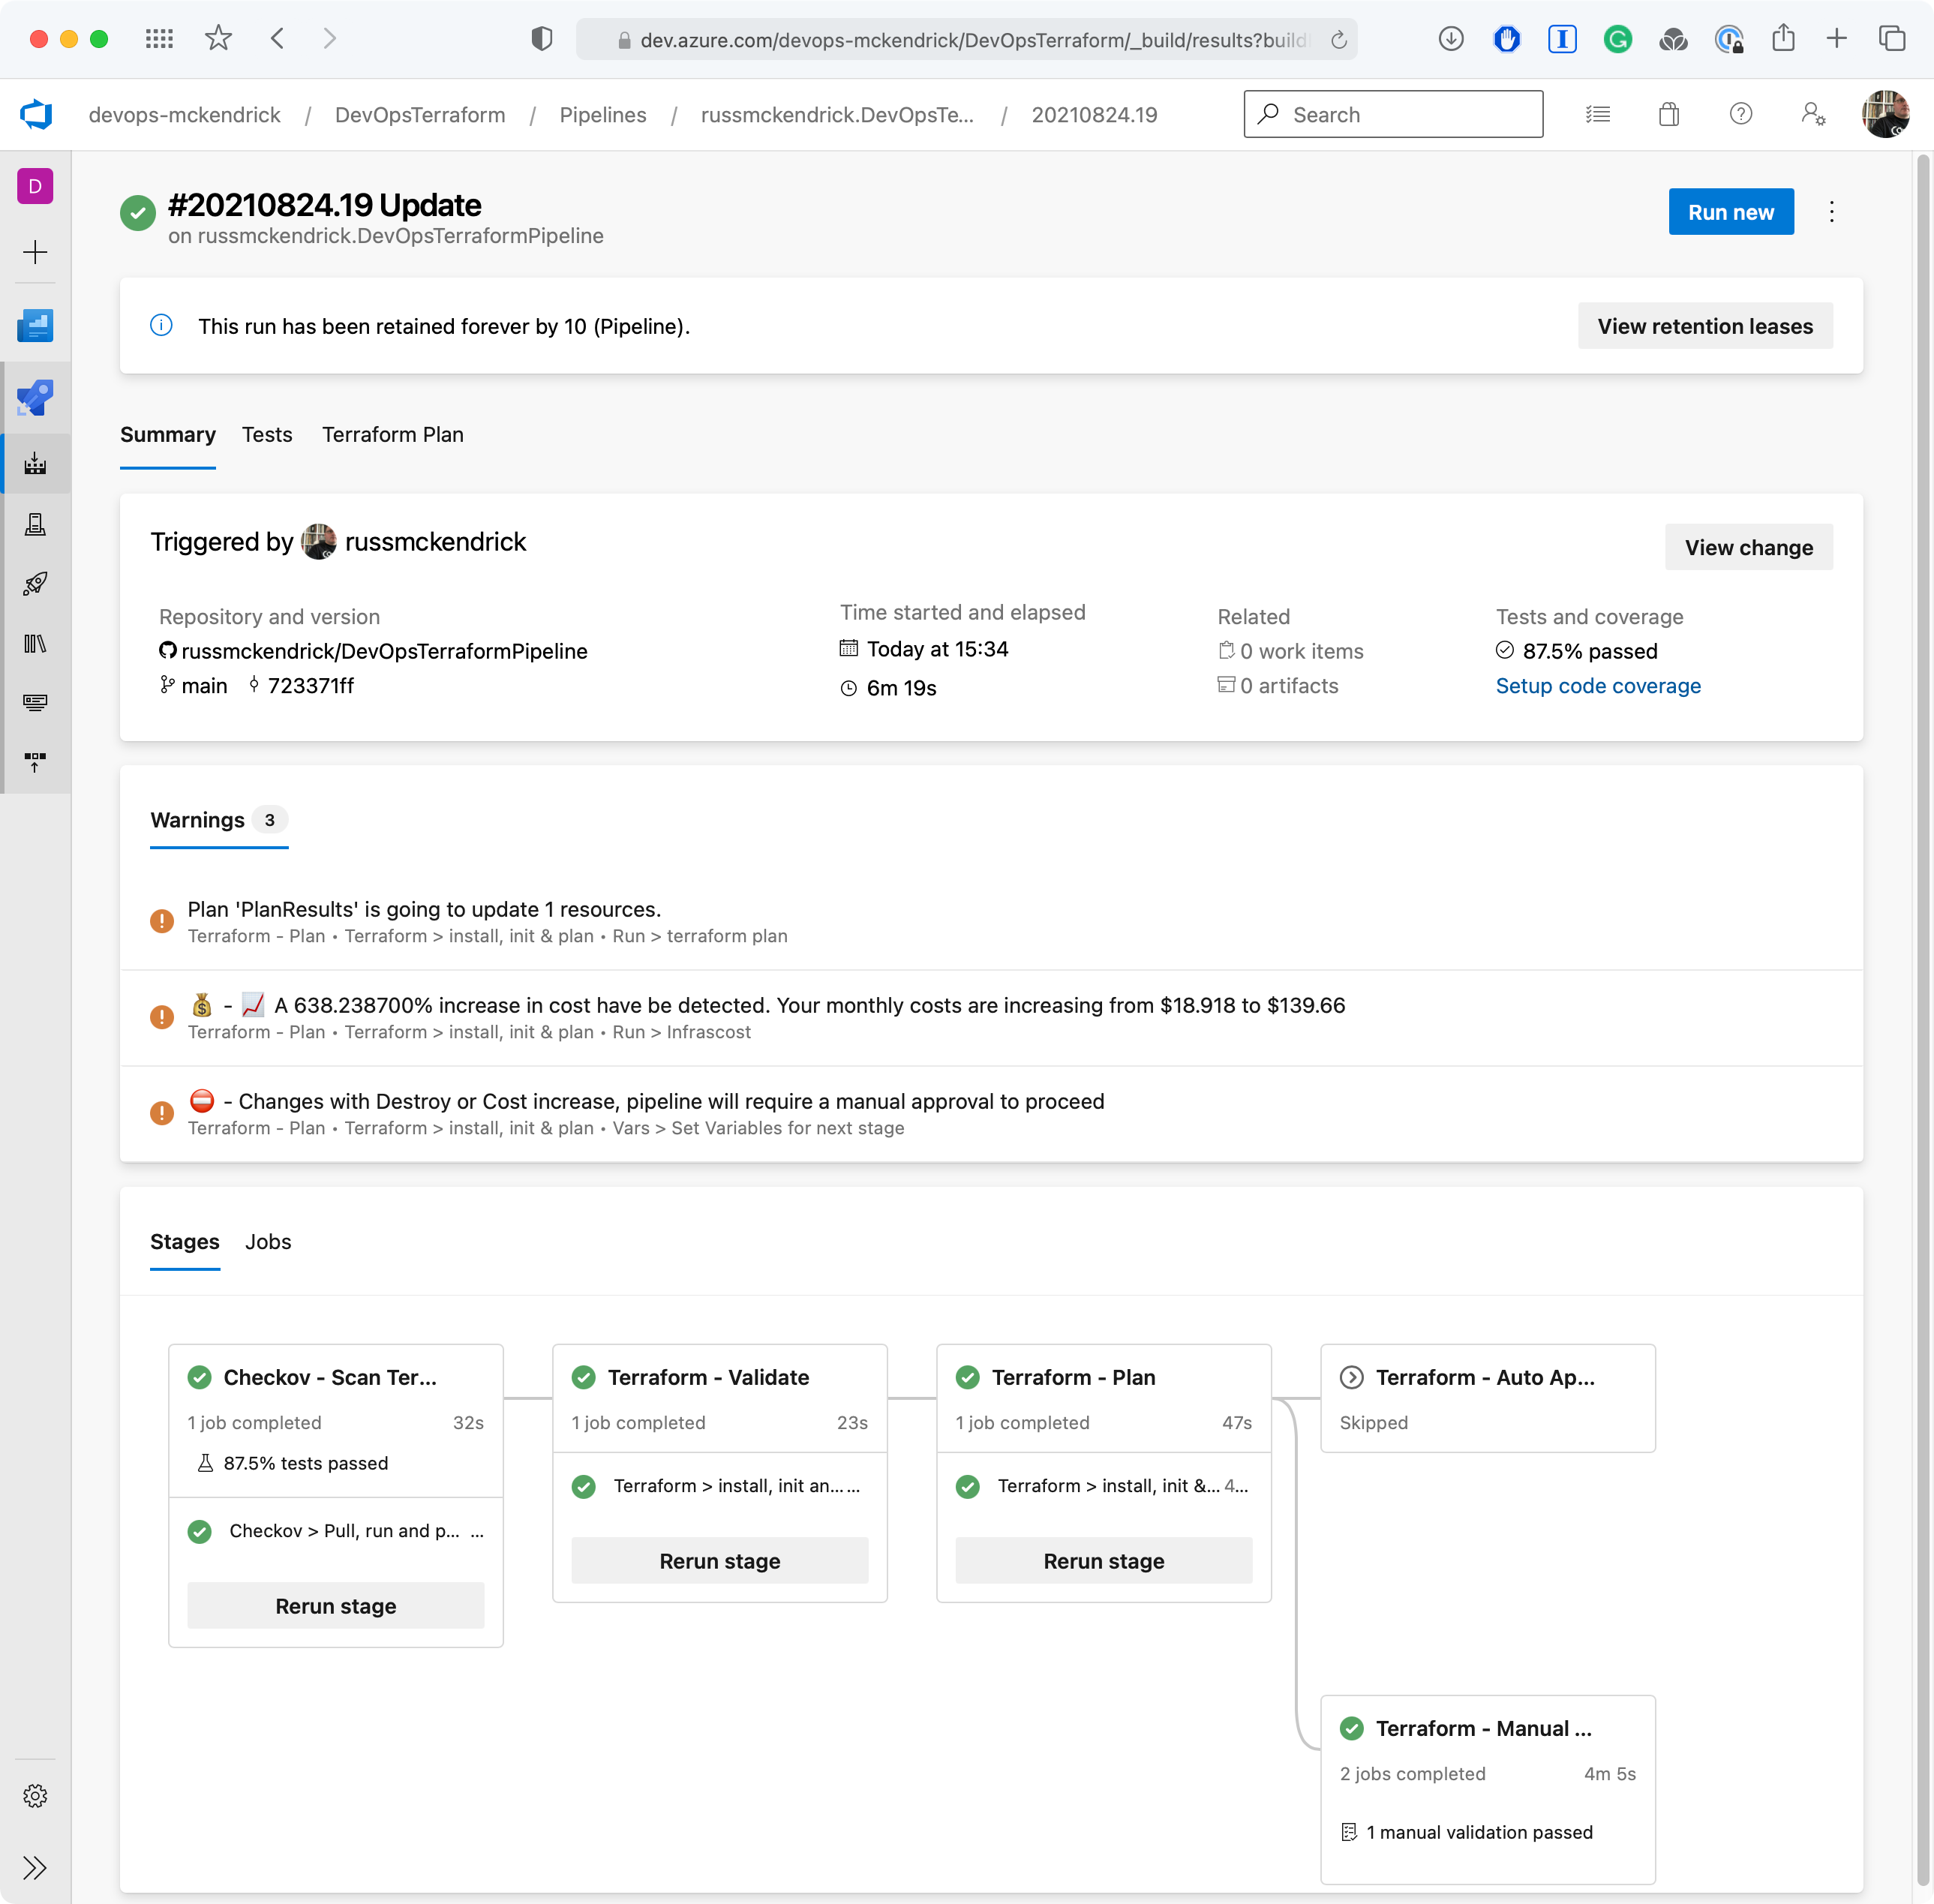
Update the SKU. Source: MediaGlasses
As you can see, a cost increase of over 50% has been detected, over 630% in-fact from $18.91 to £139.66 per month, so the $HAS_DESTROY_CHANGES has been set and the manual validation stage was executed.
Undo the change to the SKU
The final change is changing the SKU of the virtual machine back to Standard_B1ms:

Undo the change to the SKU. Source: MediaGlasses
The message this time shows that the costs have been reduced and we are OK with that, so the pipeline triggered the auto-approve stage and we didn’t have to step in and review the changes.
Summary
Now the pipeline described above differs from the native CI/CD integration provided by Infracost which can be found here. Infracost’s own integration hooks into your repo and is triggered on a pull request – as I already had a pipeline built I decided to adapt their script a little so that it fitted my own needs.
With over 3 million prices listed covering the bulk of Microsoft Azure, Amazon Web Services, and Google Cloud Platform services it should pick up the majority of common mistakes when it comes to incorrectly configuring a service using Terraform and hopefully stop you getting any nasty surprises at the end of the month.
They have also just updated the self-hosted version of the Cloud Pricing API meaning that you can connect to your own instance rather than register to use their public end-point which is extremely useful if you have limited network access, see this blog post for more information.
The full code for the pipeline and Terraform scripts covered in this post can be found in the GitHub repo here.
Further Insights

Got 2 minutes to spare to watch our Managed DevOps offering?

Do you require a DevOps Managed Service?
How Not to Screw Up Your Move to Azure

Russ McKendrick
Practice Manager (SRE & DevOps)
Russ heads up the SRE & DevOps team here at N4Stack.
He's spent almost 25 years working in IT and related industries and currently works exclusively with Linux.
When he's not out buying way too many records, Russ loves to write and has now published six books.
To find out more about Russ click here!