
Azure DevOps Terraform Pipeline with Checkov & Approvals
It’s been just over a year since I first posted about the Azure DevOps Terraform Pipeline I used to use, I say used to use because that pipeline is now a little outdated. This post covers the updated Pipeline I am starting to deploy alongside my Terraform code.
Pipeline Overview
The pipeline itself has expanded a little and it now not only uses stages but also depending on what Terraform is planning on doing it will trigger a manual approval process should there be any resources being destroyed.
The stages in the pipeline are as follows;
- Checkov Scan, this stage run Checkov, a tool by BridgeCrew which scans Terraform configuration to find common misconfigurations before they’re deployed. The results of the scan are uploaded to the Pipeline run and are available as a report.
-
Terraform Validate, this stage run the
terraform validatecommand to check that the Terraform files are valid, if there are any problems the pipeline errors. -
Terraform Plan, this stage runs the
terraform plancommand. Depending in the state of resources it finds variables are set which are used to determine the next stage which is executed. The output of theterraform plancommand is also upload to Azure DevOps. -
Terraform Apply (Auto Approval), if the Terraform Plan stage determines that the only changes to the state are additions then this stage is ran, it performs the
terraform applyand effects the change. -
Terraform Apply (Manual Approval), if the Terraform Plan stage determines that the changes to the state includes any resources being destroyed then this stage is ran, it triggers a manual approval task prompting someone to check before the
terraform applycommand is executed.
The whole workflow can be found below (click on the image for a larger view);
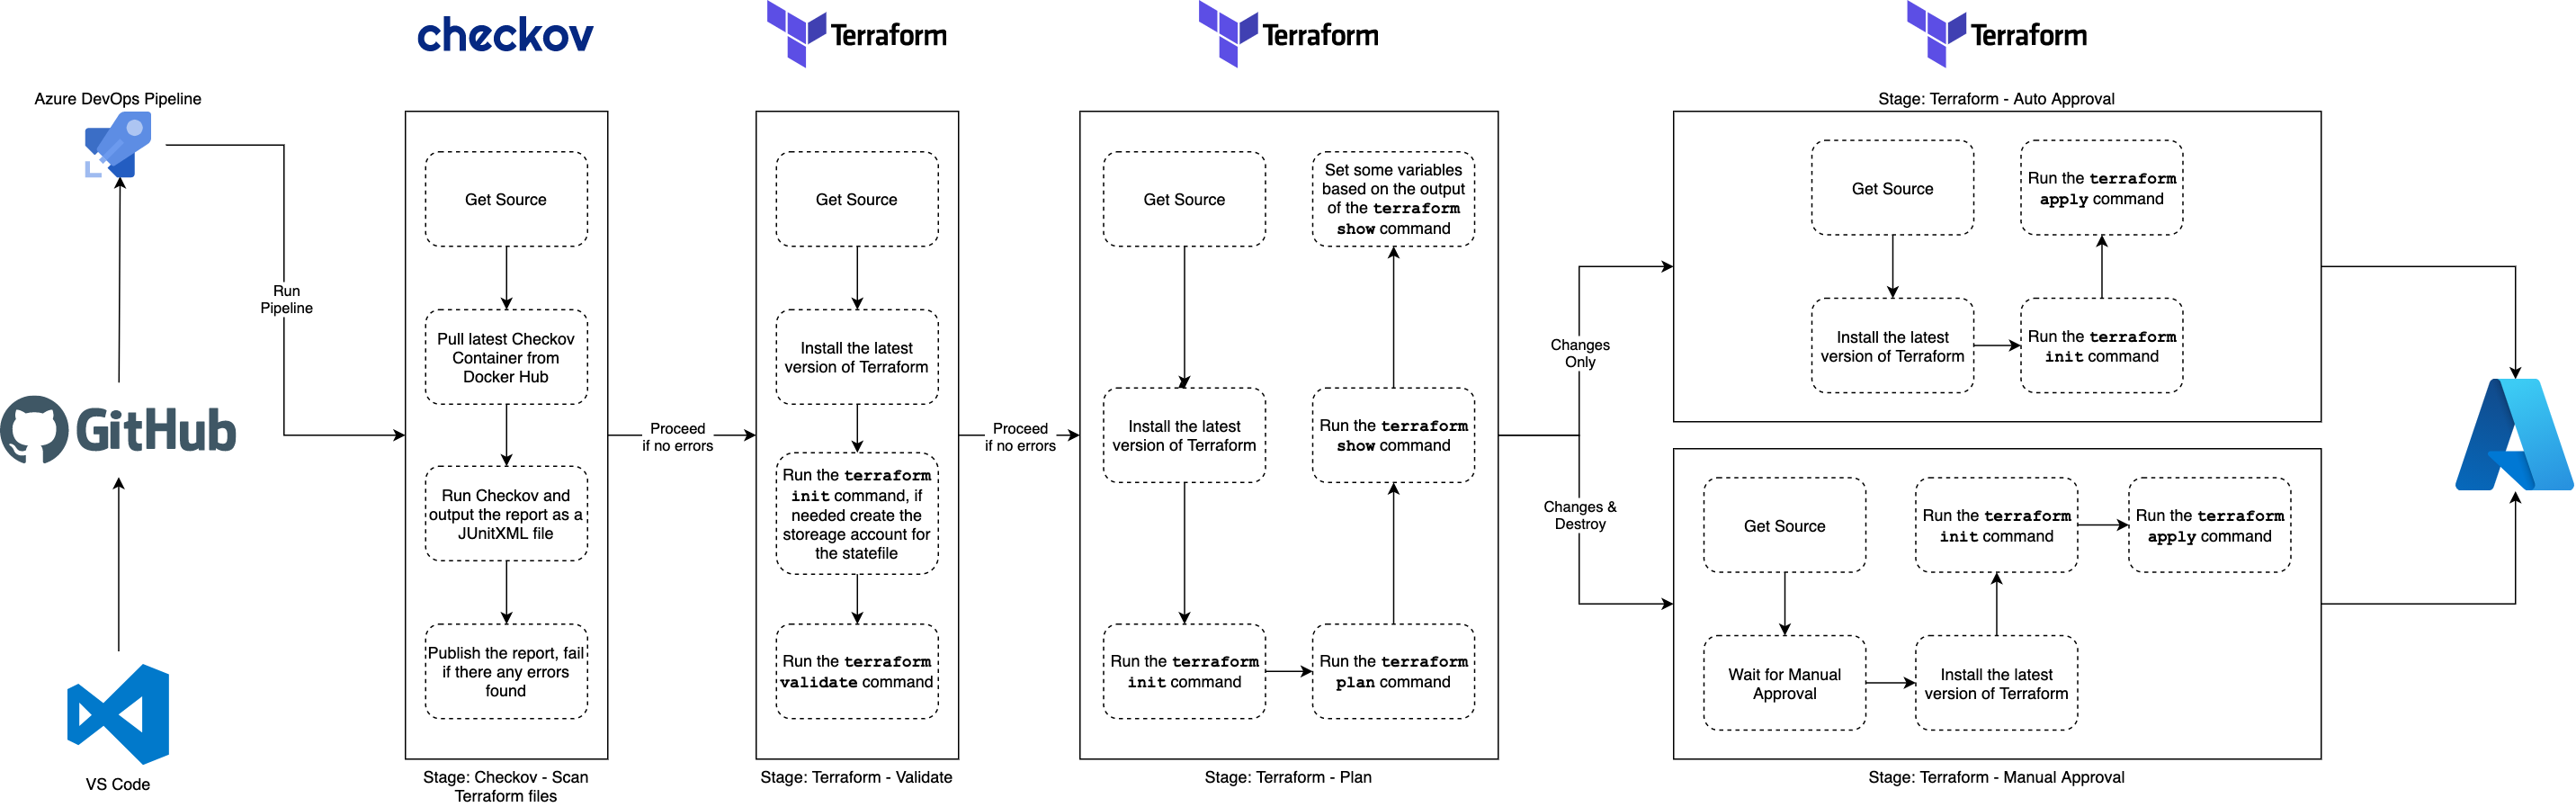
Azure DevOps Pipeline Workflow {Source: MediaGlasses}
As well as the addition of the stages detailed above, the pipeline has moved to using the Terraform Azure DevOps extension from Microsoft DevLabs to the Terraform Azure DevOps extension by Charles Zipp.
The reasoning for this is that the extension by Charles Zipp enables a lot of the functionality I needed to enable the two different approval stages without having to code the logic myself — which I am always a fan of 😉
The Stages
Now that we have an idea of what should happen, let’s take a look at what the pipeline looks like.
Stage: Checkov Scan
The first stage to run downloads and executes a scan of the Terraform files using Checkov, you will notice the YAML below that we are pulling the Checkov container from Dockerhub and running it;
The command to run a Checkov scan locally on your own machine using Docker is below, just make sure you run it within same folder as your Terraform code;
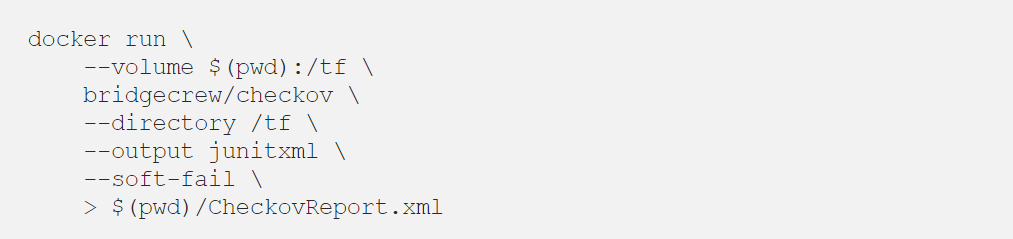
As you can see we are mounting the current folder (the $(pwd) variable) which as we have set the workingDirectory to be where the code has been checked out using the$(System.DefaultWorkingDirectory) variable. We are also setting the --output to be junitxml and then piping the output to a file called CheckovReport.xml.
The reason for using the --soft-fail flag is that if we didn’t and Checkov was to find any problems the container would exit with a status which would cause the stage to fail with this task. Instead, we want to fail the task should there be any errors in the report once we have published the results of the scan.
We are publishing the test results using the built in PublishTestResult task, with the failTaskOnFailedTests option set as true.
We will set what happens when, or if, this stage fails later in the post.
Stage: Terraform Validate
This stage run the terraform validate command, and if there are any problems it will fail. As you can see the from YAML below, the stage dependsOn the runCheckov stage and we are also installing Terraform and running terraform init before the terraform validate command is executed;
One of the other things which will happen when this stage is executed happens as part of the terraform init task, as we are setting ensureBackend to true the task will check for the presence of the Azure Storage Account we wish to use to store our Terraform state file in, if it is not there then the task will helpfully create it for us.
Once your code has been validated we can move onto the next stage.
Stage: Terraform Plan
This stage is where things get a little more interesting, eventually, as our environment does not persist across stages we need to install Terraform and run terraform init again.
Once that has been done we are running the terraform plan command, thanks to some of the features in the Terraform Azure DevOps extension by Charles Zipp we are able to publish the results of running terraform plan to our pipeline run by setting the publishPlanResults option.
Before we look at the last tasks of this stage lets look at the code for the full stage;
As you can see, after we have ran terraform plan we are immediately running terraform show using the terraform.tfplan file we just generated.
You maybe think to yourself, why do that? Well, when using the Terraform Azure DevOps extension by Charles Zipp it actually sets a few really useful variables. To start with, if there are any changes as a result of the terraform plan command a variable called TERRAFORM_PLAN_HAS_CHANGES is set as true.
When the terraform show command is executed against a .tfplan a second variable namedTERRAFORM_PLAN_HAS_DESTROY_CHANGES will be set as true if the .tfplan contains any resources which are being destroyed.
In the final task of the stage we are using bash to set some variables which will help decide which, if any, of the following stages will be executed.
So if …
-
TERRAFORM_PLAN_HAS_CHANGES=true -
TERRAFORM_PLAN_HAS_DESTROY_CHANGES=false
… then it is safe to proceed automatically execute the next stage, so we can pick this up in the next stages we are setting a variable named HAS_CHANGES_ONLY to true.
But, if we get …
-
TERRAFORM_PLAN_HAS_CHANGES=true -
TERRAFORM_PLAN_HAS_DESTROY_CHANGES=true
… then we should prompt someone to check that what is going to be destroyed is expected, so by setting a variable called HAS_DESTROY_CHANGES to true.
Finally, if …
-
TERRAFORM_PLAN_HAS_CHANGESis nottrue
… then we are just printing a message which will be displayed within the pipeline run to say that no changes were detected.
Stage: Terraform Apply (Auto Approval)
As you may have already guessed, this stage is only executed if the following condition is met;
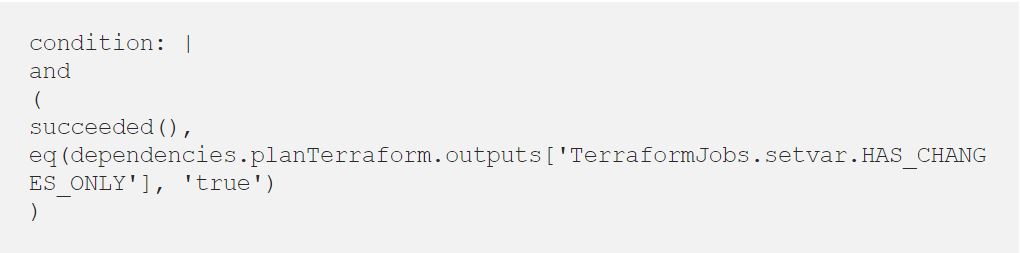
As you can see, we are referencing the variable which was set in the previous stage using the following echo command;

The variable is then referenced by adding the names of the stage, job, task and the variable itself, so something like;

The full stage looks like the following;
As you can see, we are again installing Terraform and running terraform init before finally running terraform apply.
Stage: Terraform Apply (Manual Approval)
This stage is almost exactly the same as the Auto Approval apart from the inclusion of a job which runs before the Terraform job;
This job basically stalls the pipeline execution for 24 hours, after which, if no-one approves the run, the job will fail. The job utilises the ManualValidation@0 task, more detail on which can be found at https://docs.microsoft.com/en-us/azure/devops/pipelines/tasks/utility/manual-validation.
Once approved the Terraform job will be executed which will ultimately run terraform apply which will result in at least one of the resources in your Terraform state file being destroyed.
Running the Pipeline
Let’t now take a look at running the pipeline, first let’s check in some code which adds a basic Resource Group.
The Terraform code for this looks like the following;
I am using the Azure CAF Name provider to generate the name of the resource group and then the AzureRM provider to create it.
Initial Run
As you can from the screen below, there was a single error, which stated that the storage account for the Terraform state file did not exist, buts that OK as that will be created for us.
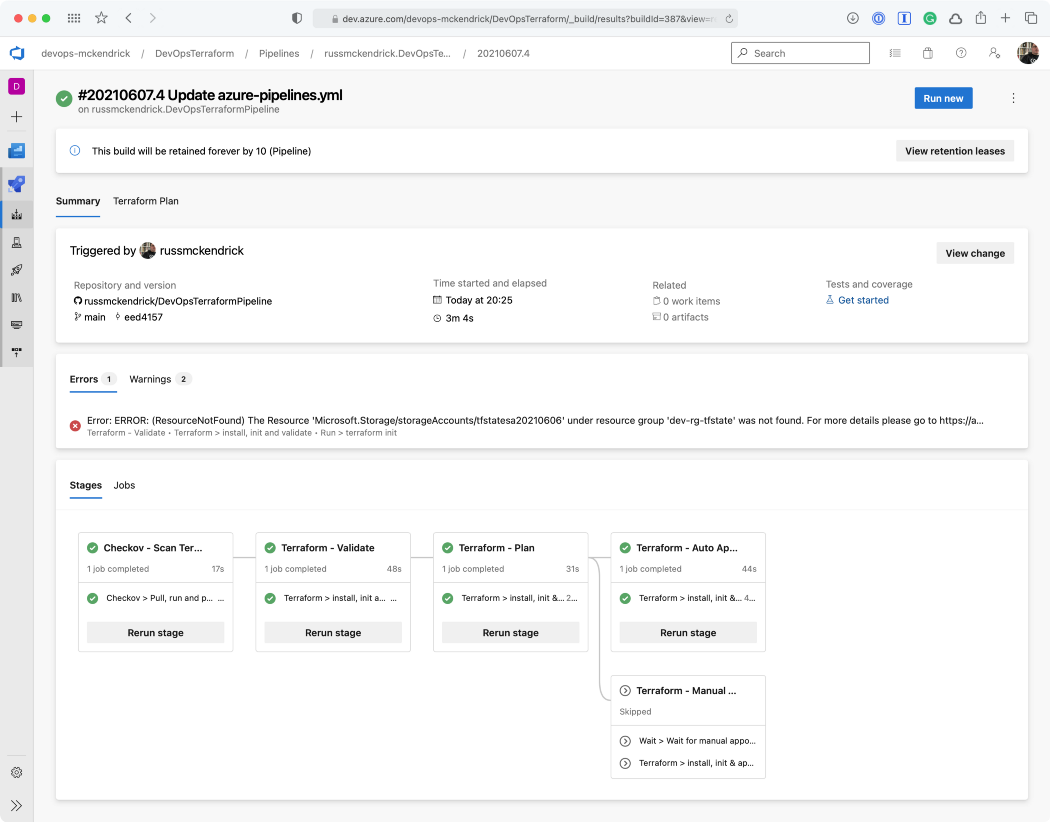
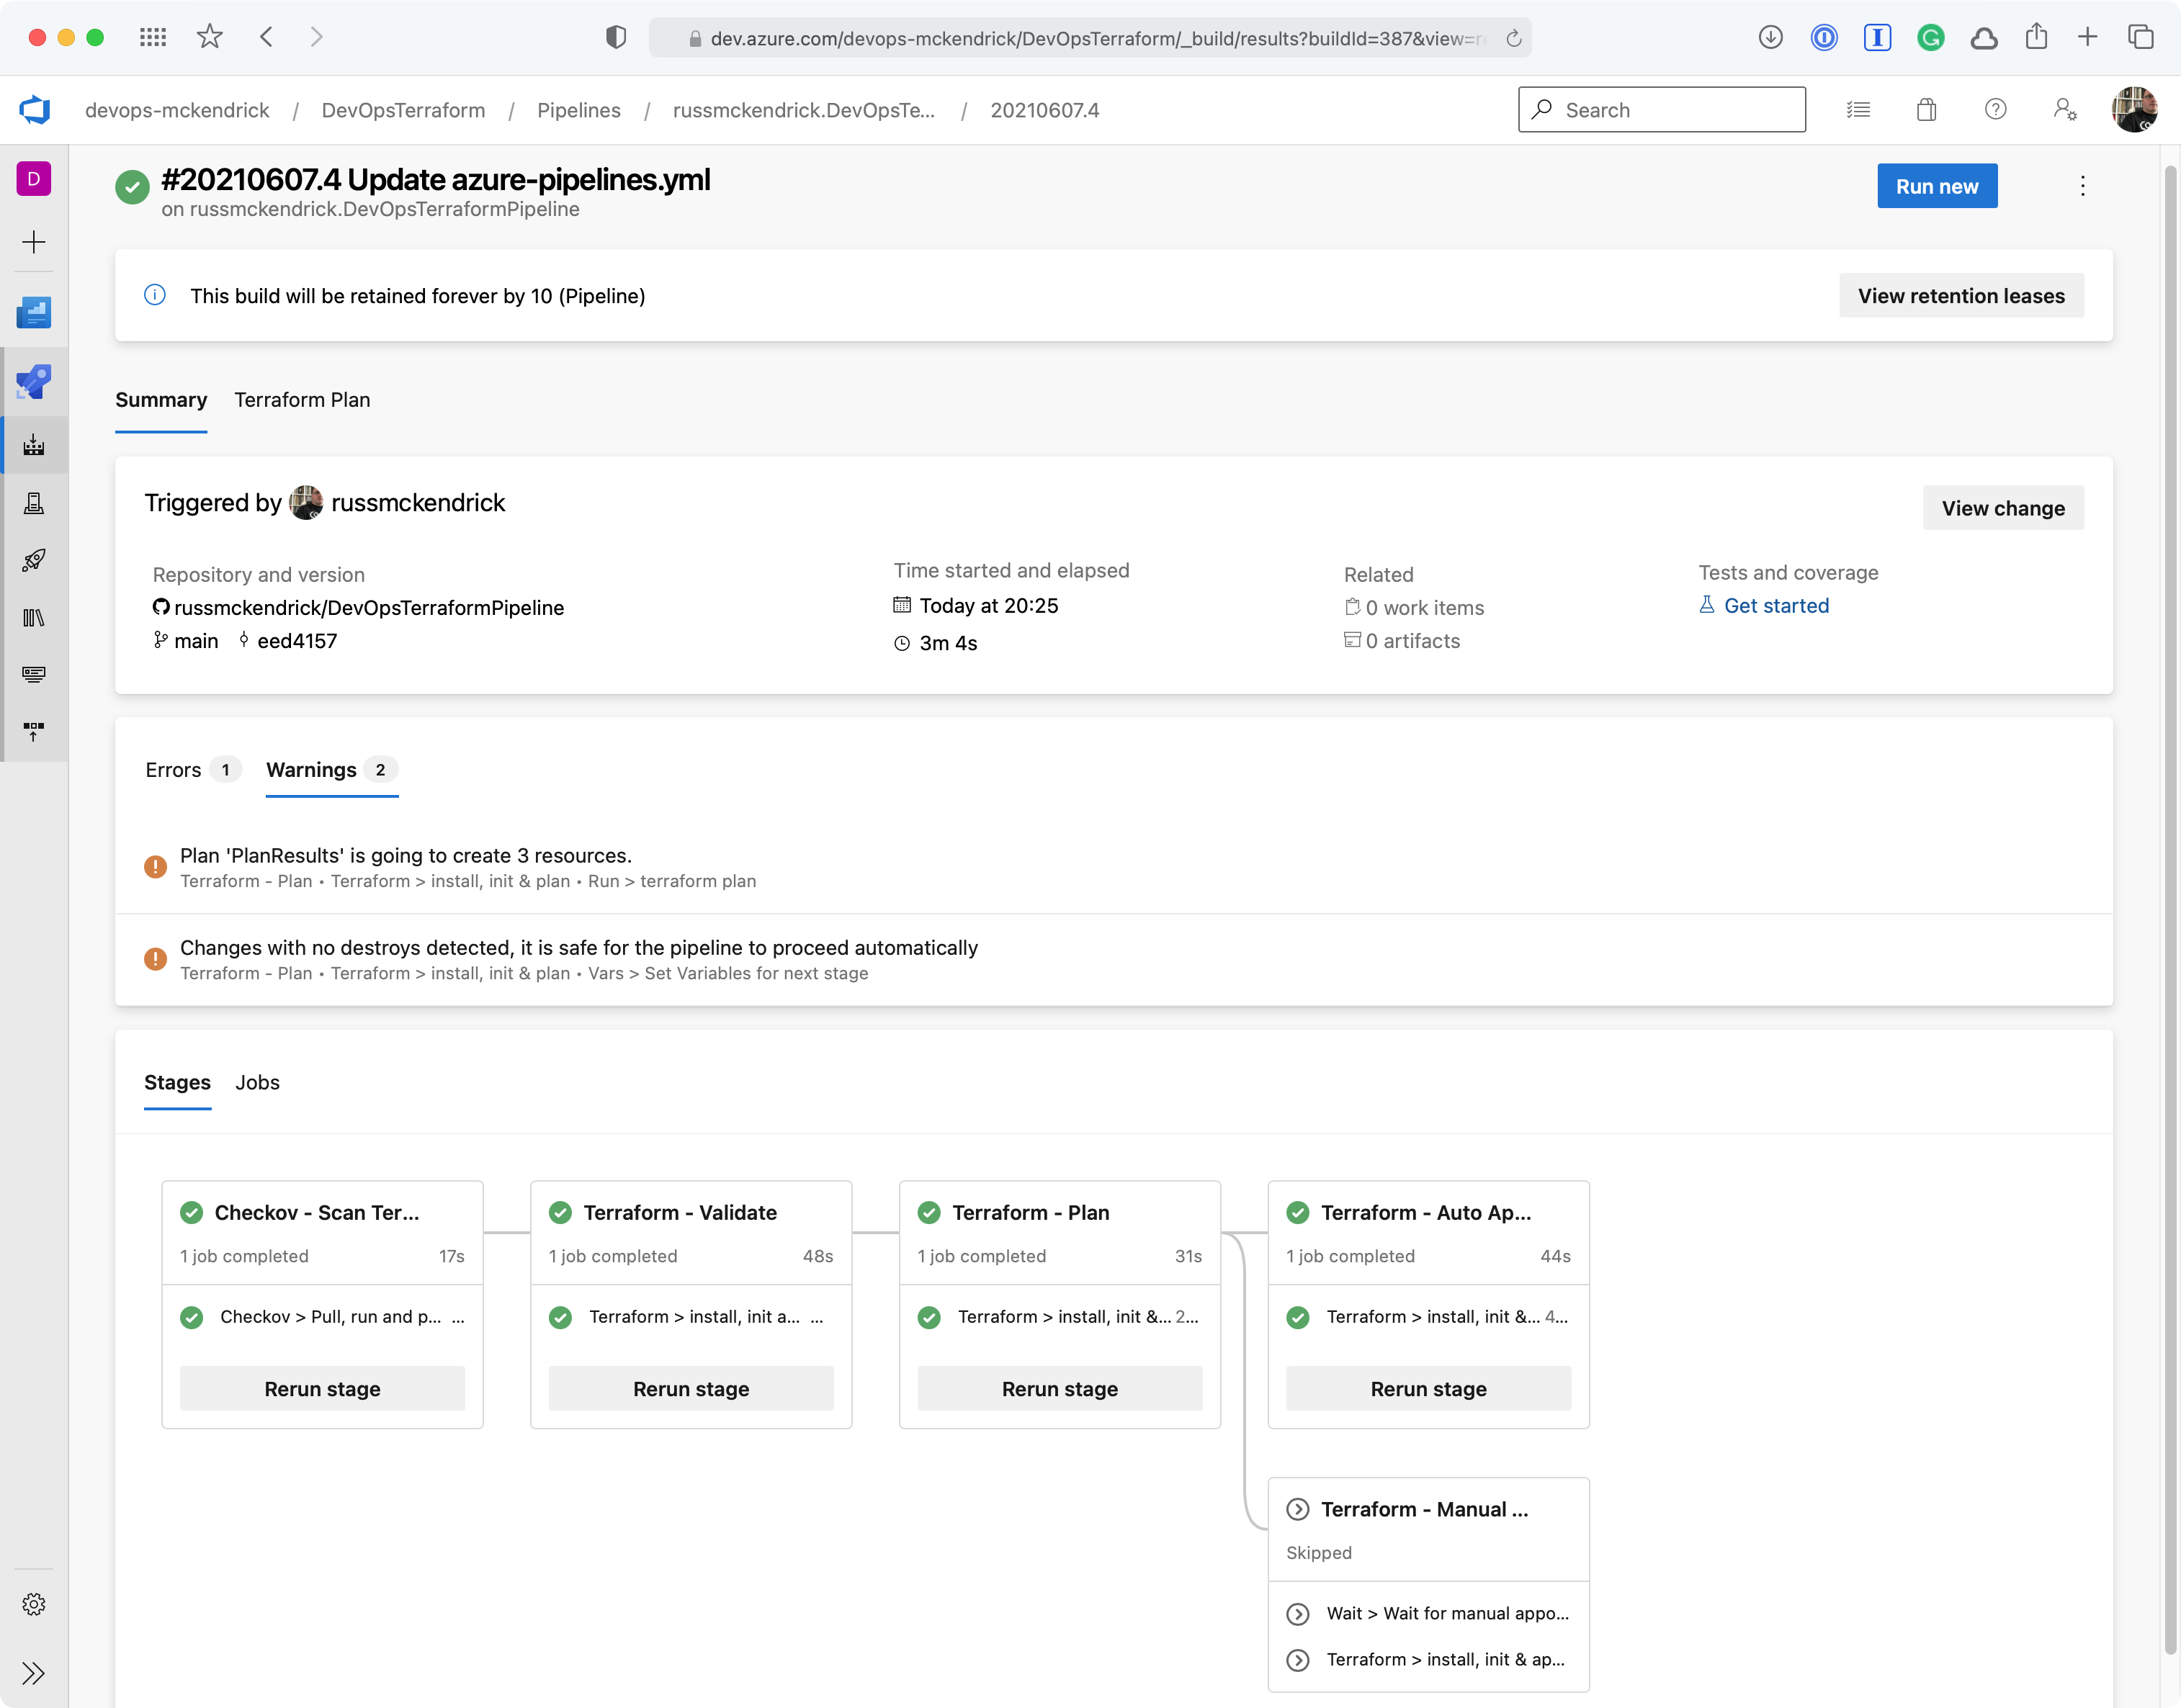
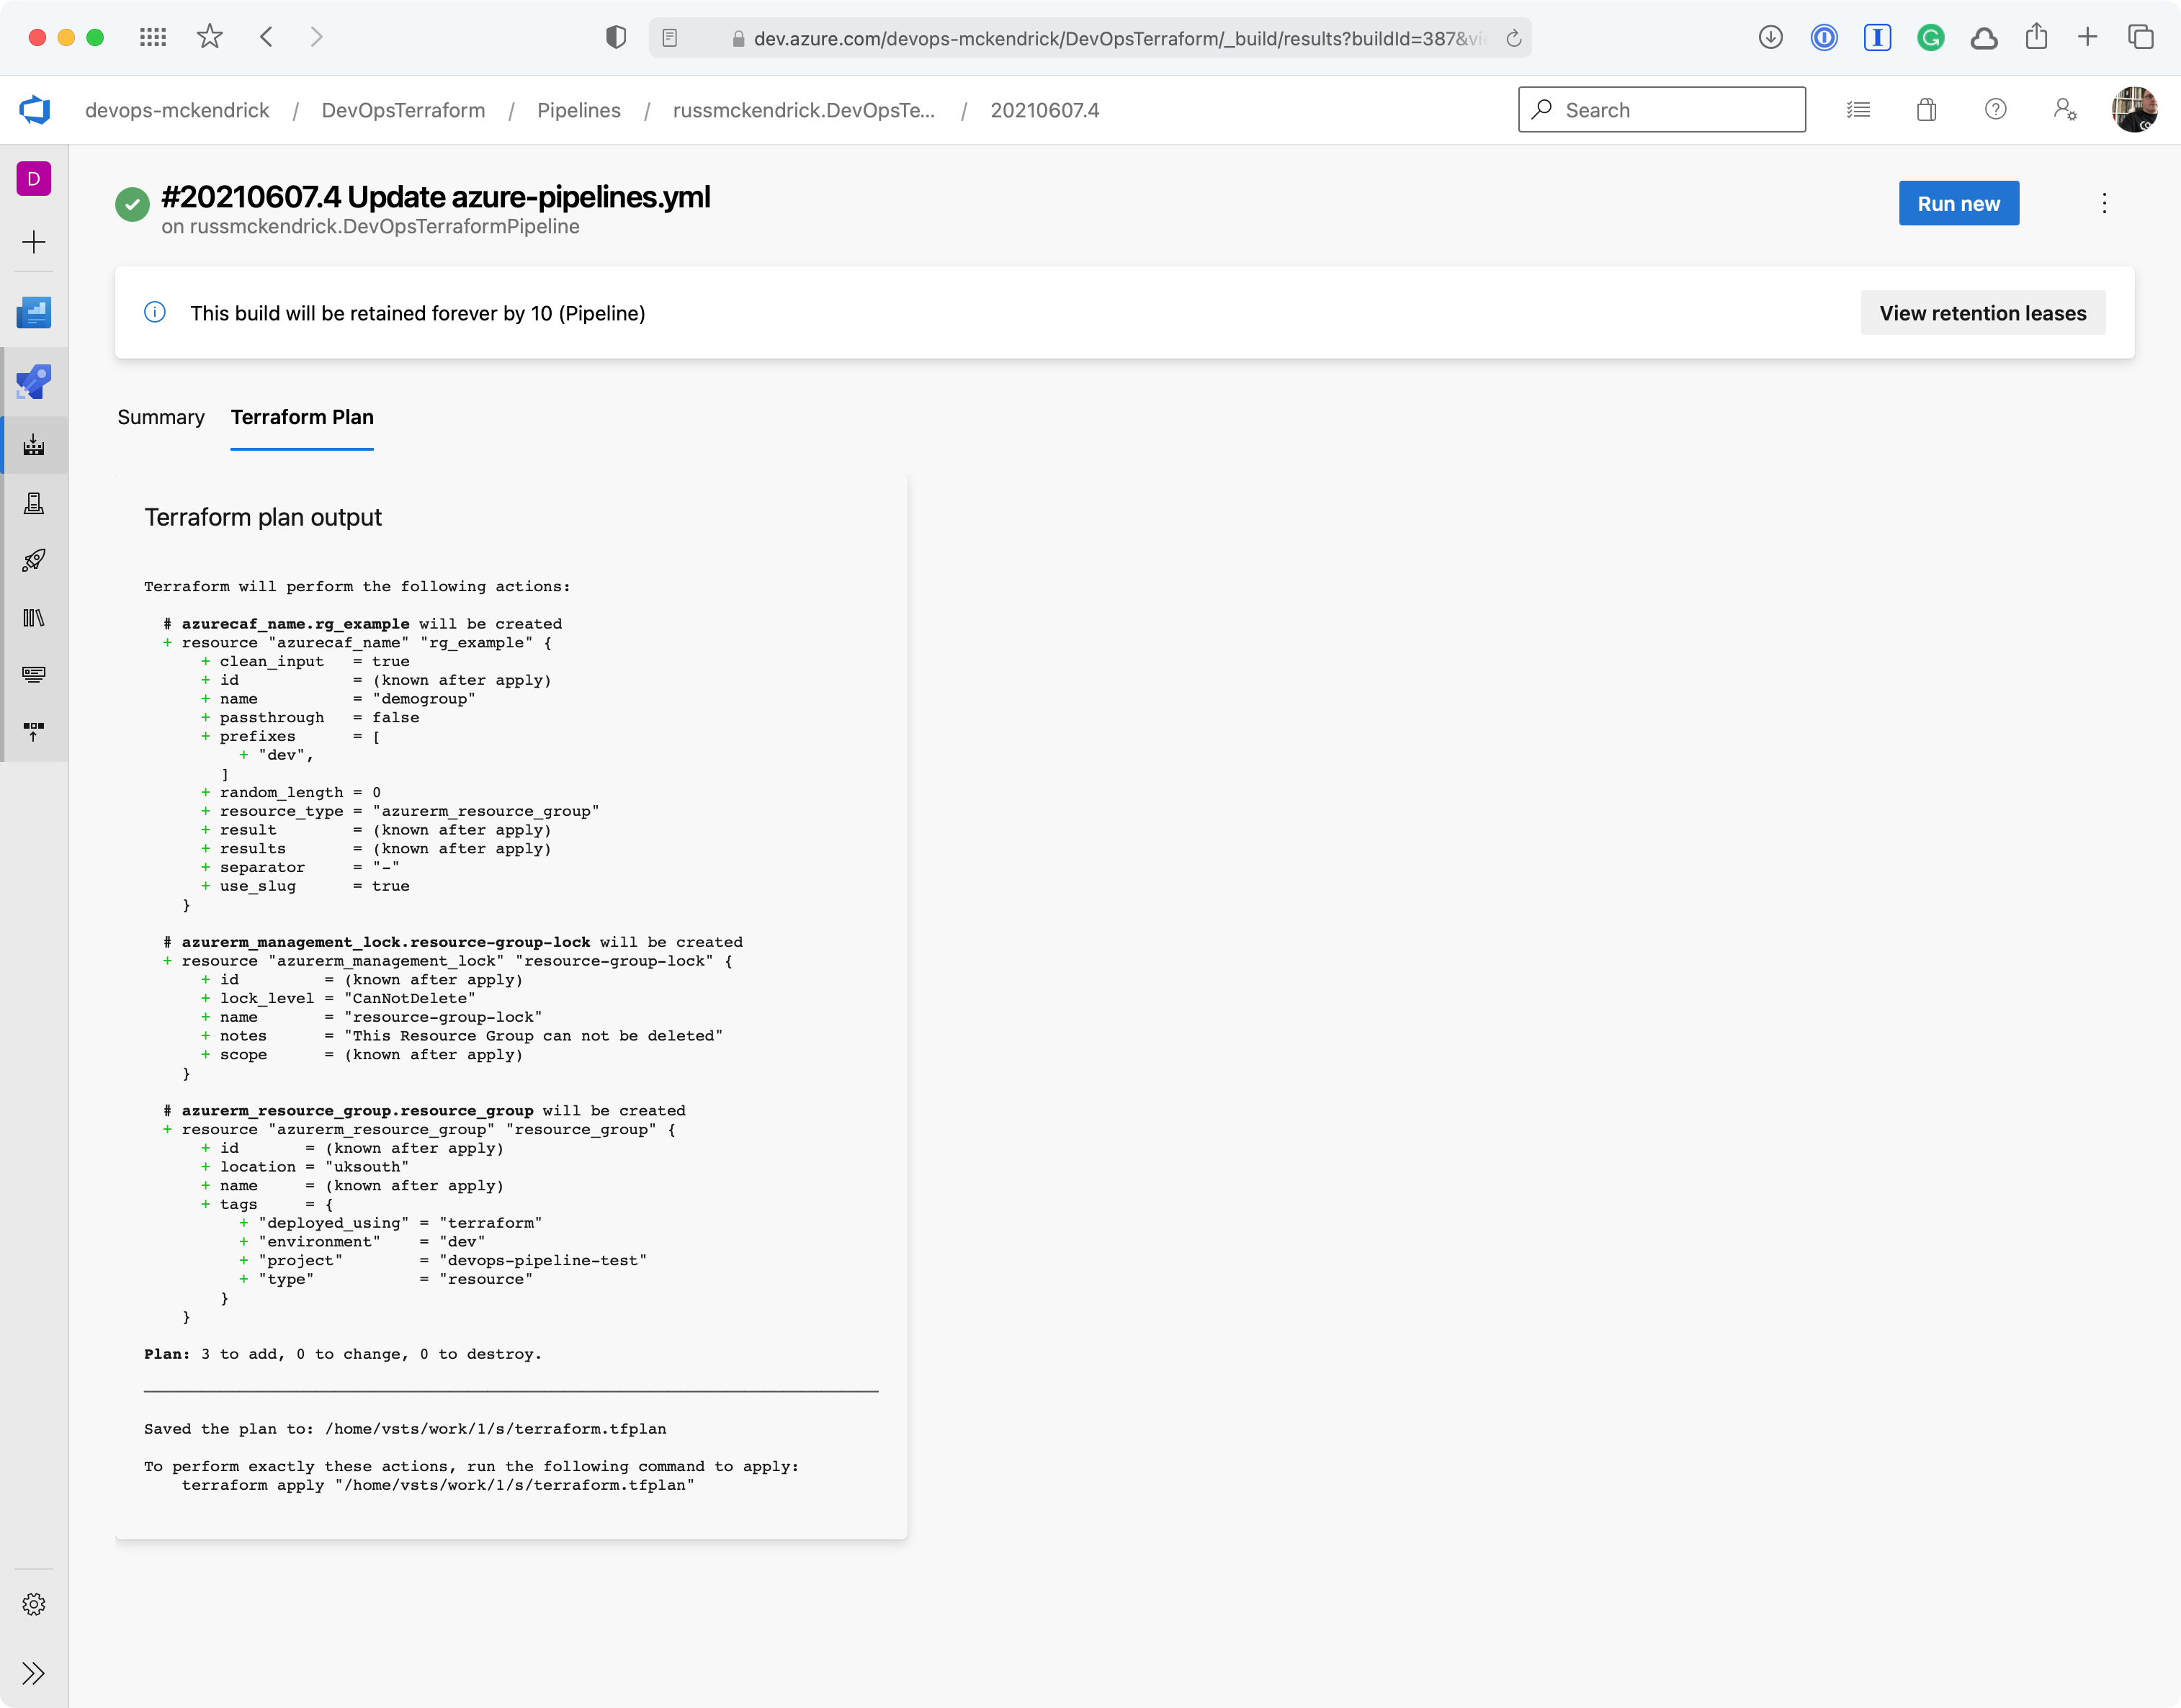
Warnings and the Terraform Plan {Source: MediaGlasses}
No ChangesRun
The next run didn’t add, change or remove any resources which meant that neither the HAS_CHANGES_ONLY or HAS_DESTROY_CHANGES variables were set to true, so the terraform apply stages did not run this time;
Nothing to change {Source: MediaGlasses}
Introducing some mistakes
One thing which hasn’t happened yet is that we have not added anything which Checkov would scan, let’s do that now by adding a Network Security Group to our Terraform file;
Nothing to bad on the face of it you maybe thinking, let’s commit the change which will trigger a run of the pipeline;
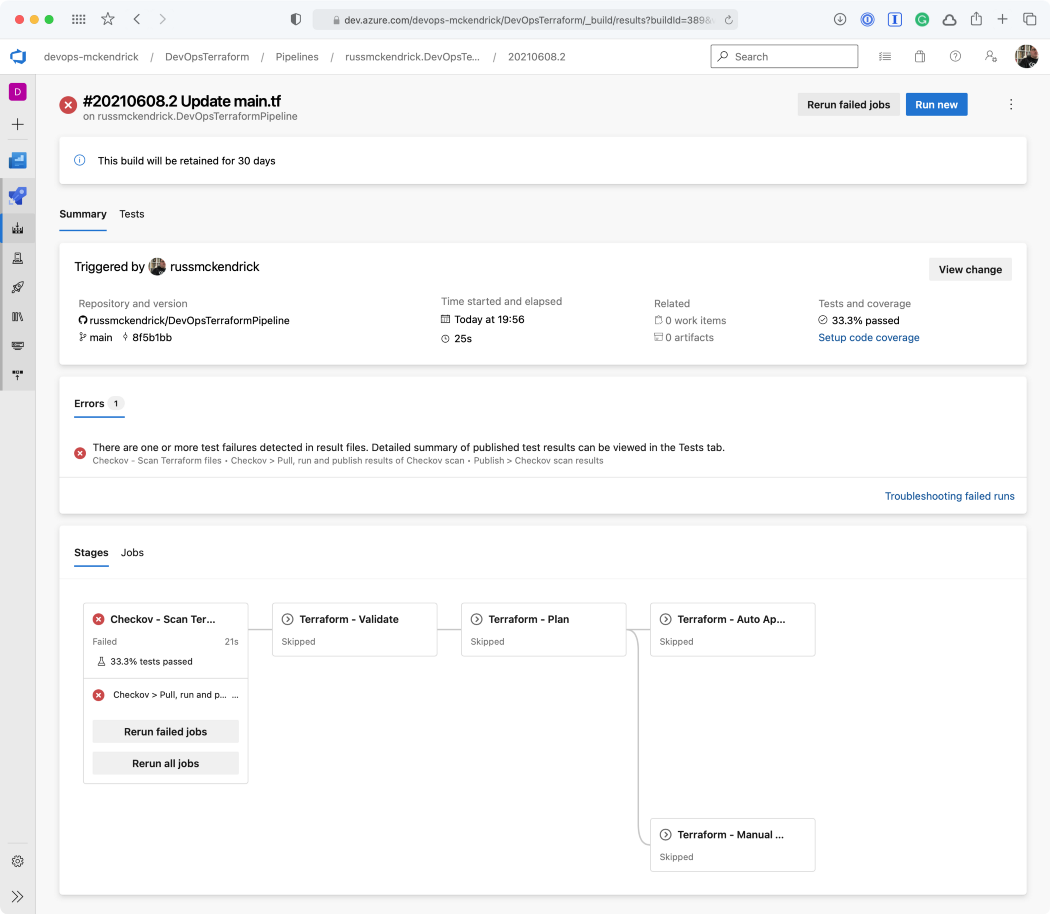
Whoops, the Checkov stage failed, clicking on Tests should give us more information as to why;
Viewing the report {Source: MediaGlasses}
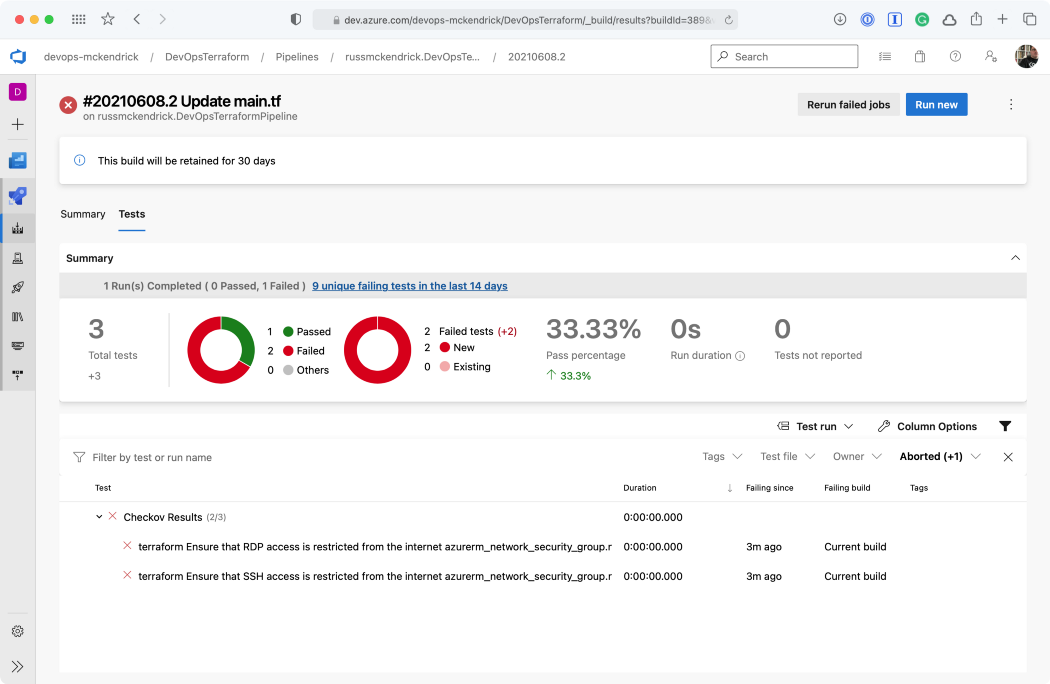
Clicking on either the two results will give a more information;


Getting a little more information {Source: MediaGlasses}
As you can see, we are allow full access to both SSH and RDP to the whole internet — not a great idea so we will need to update the code to lock those two rules down to an IP address. Thankfully, the Checkov stage errored before any of the Terraform stages were executed meaning that our mistake never made it as far as being deployed.
A quick code change & commit later and we have the tests passing and the changes being automatically deployed — which is expected as there is only the addition of the network security group;


Crisis averted !!! {Source: MediaGlasses}
Let’s now look at removing the network security group we just added.
Manual Approval
Commenting out the network security group configuration in the Terraform code and committing it should be enough to trigger a run which will resource in resources being removed.
This will result in an e-mail;
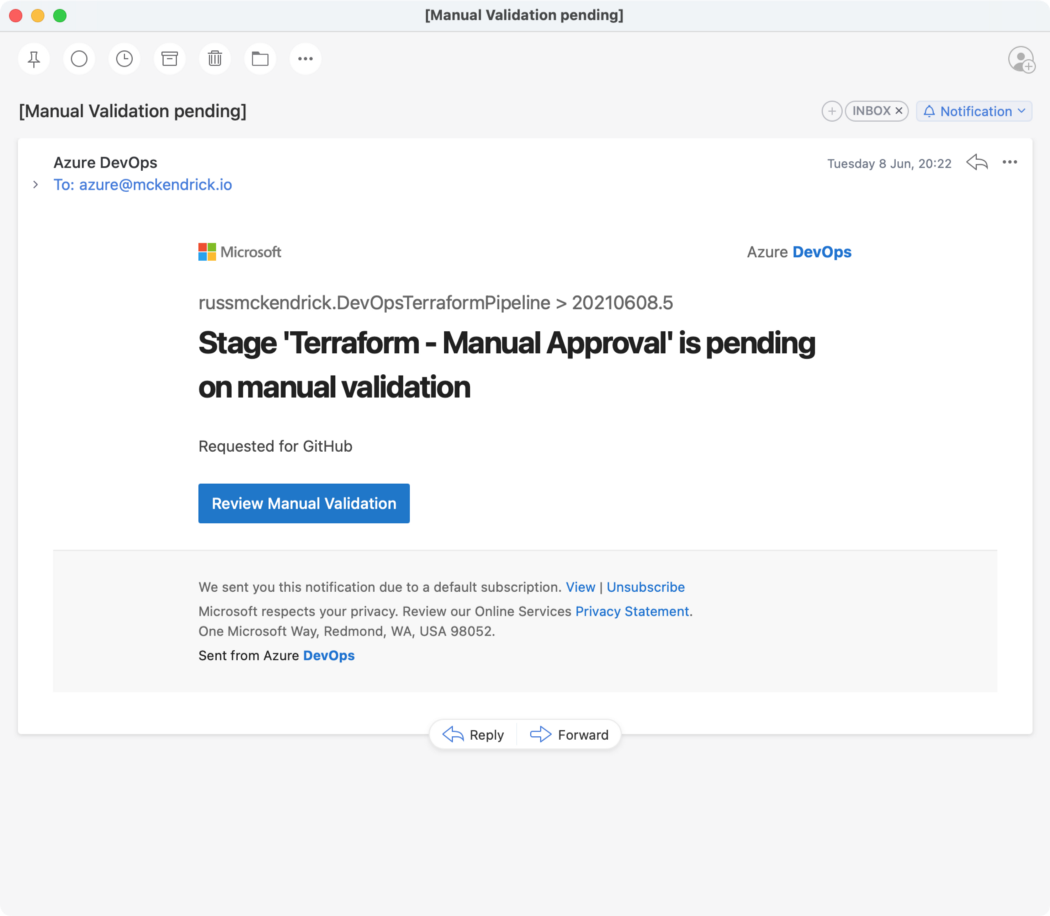
The Email {Source: MediaGlasses}
Going to the pipeline, clicking on Review, entering a comment then pressing the Resume button will then trigger the terraform apply stage;
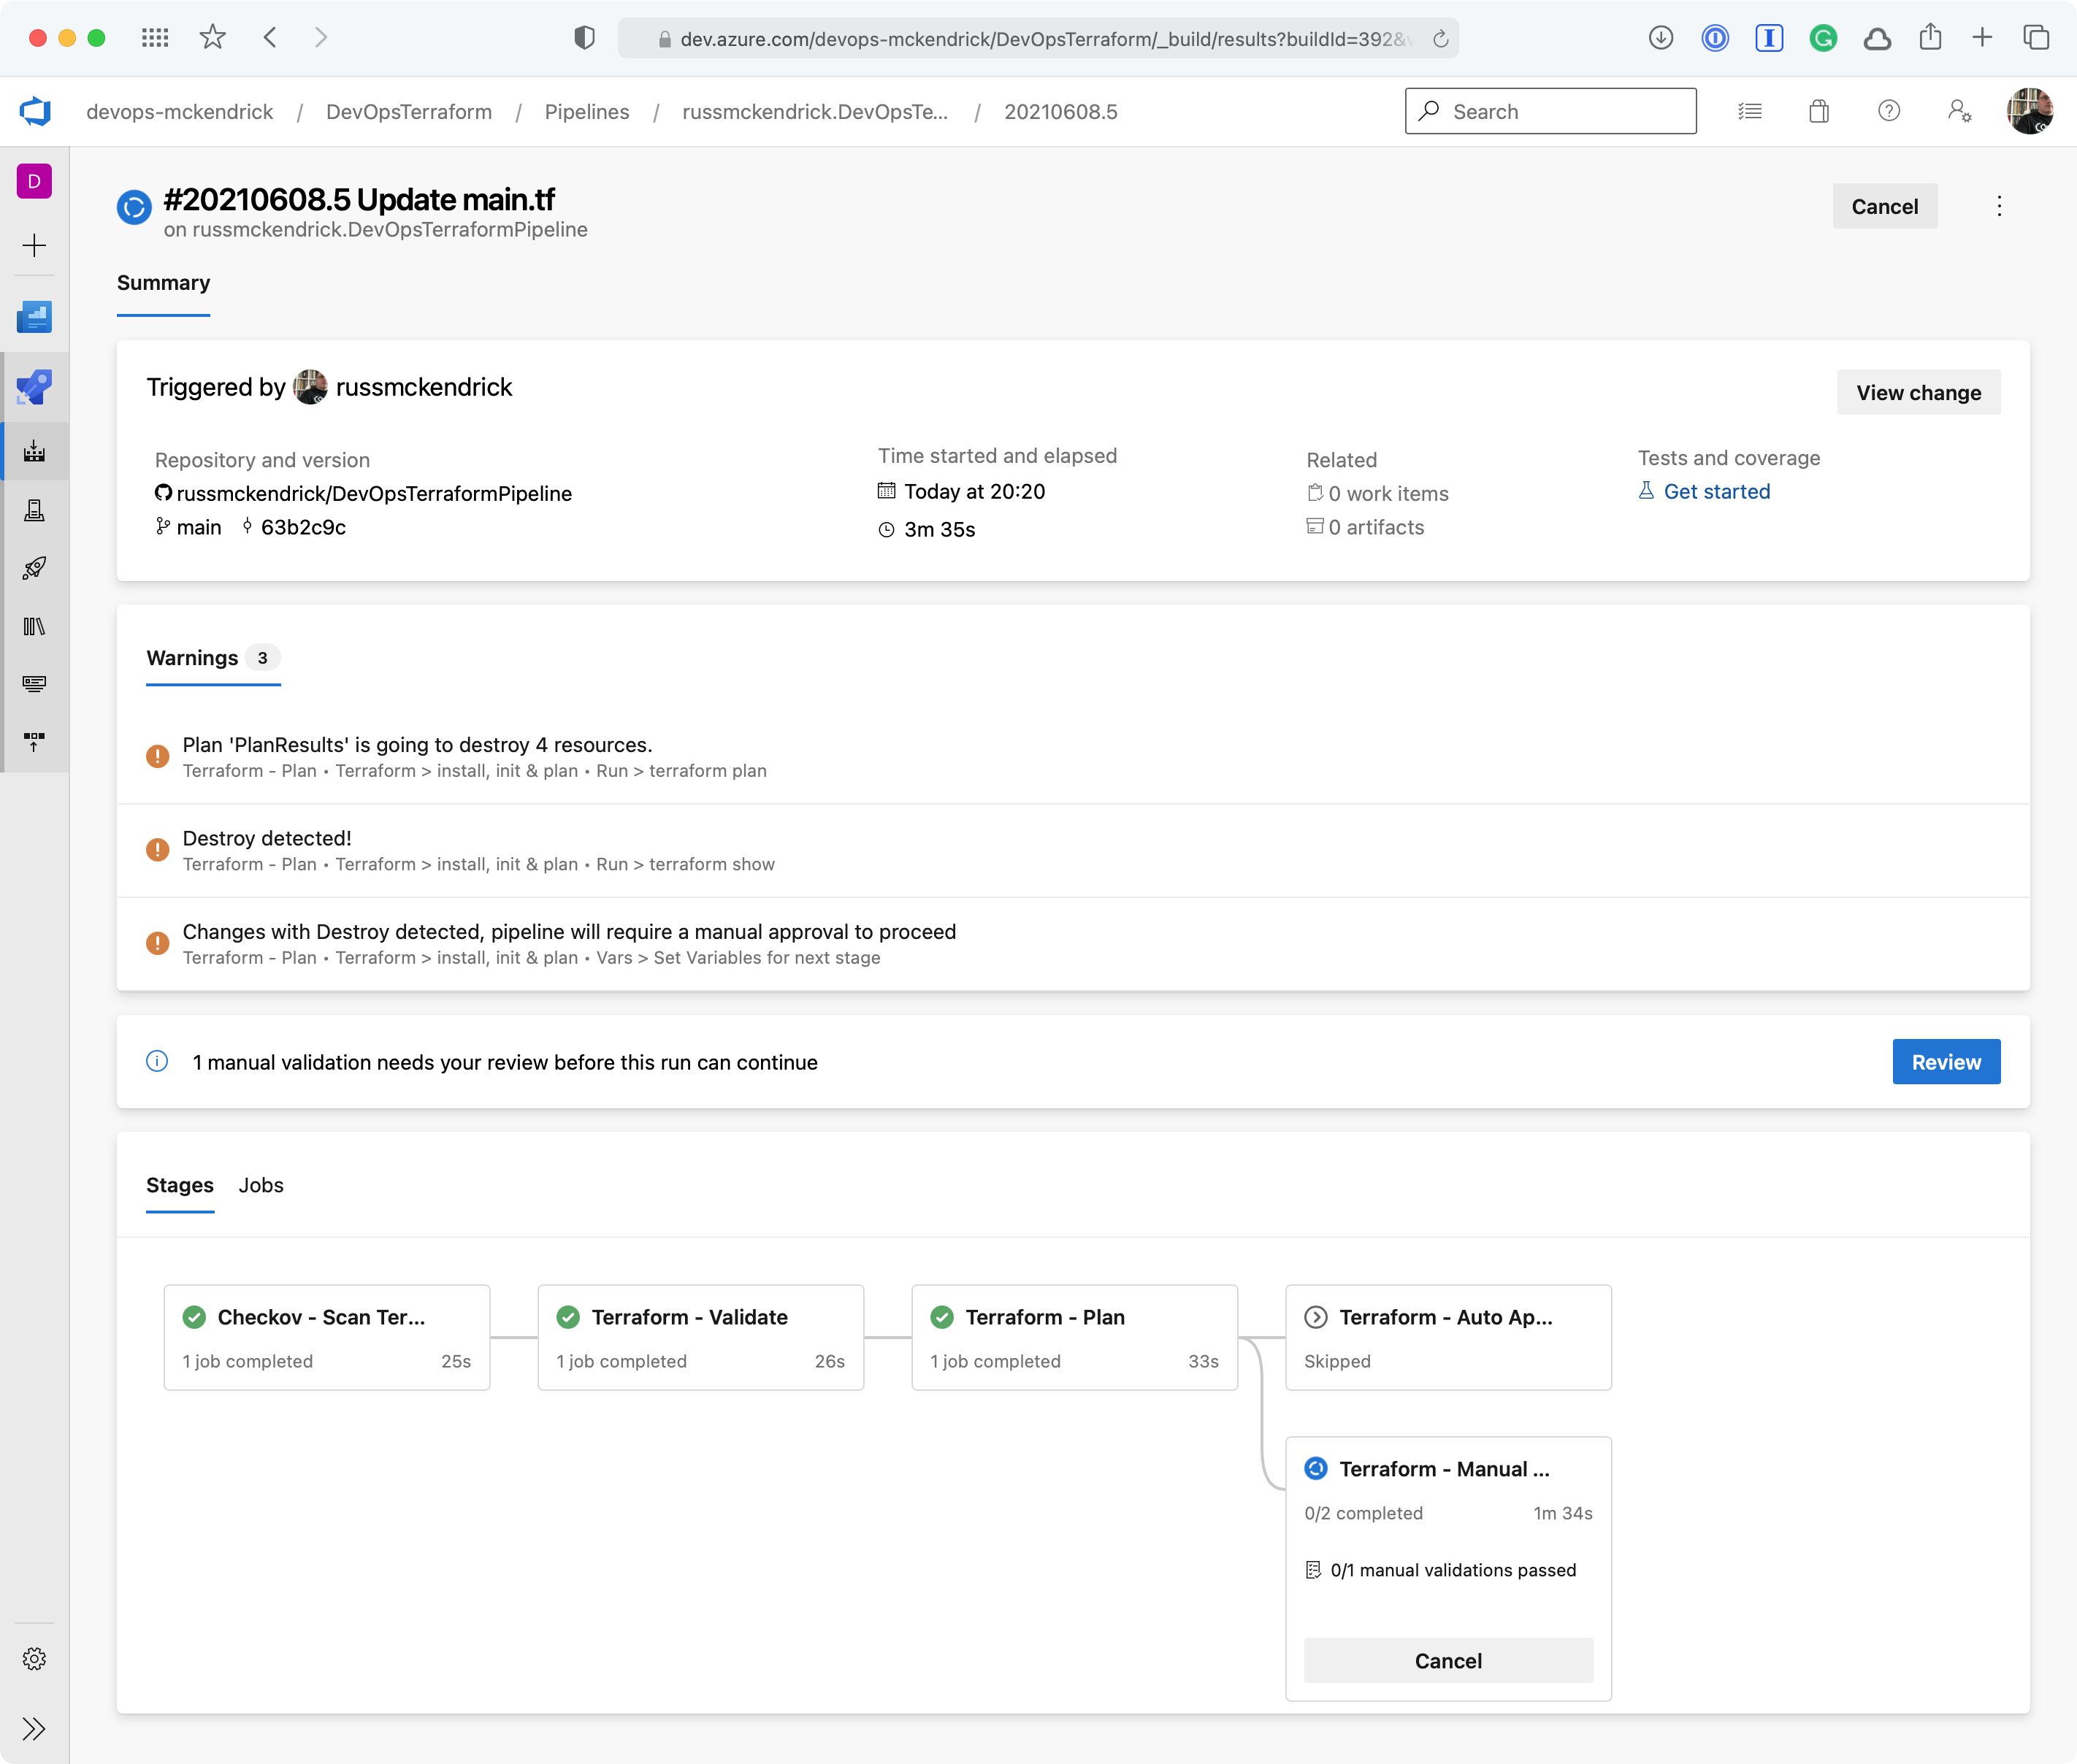
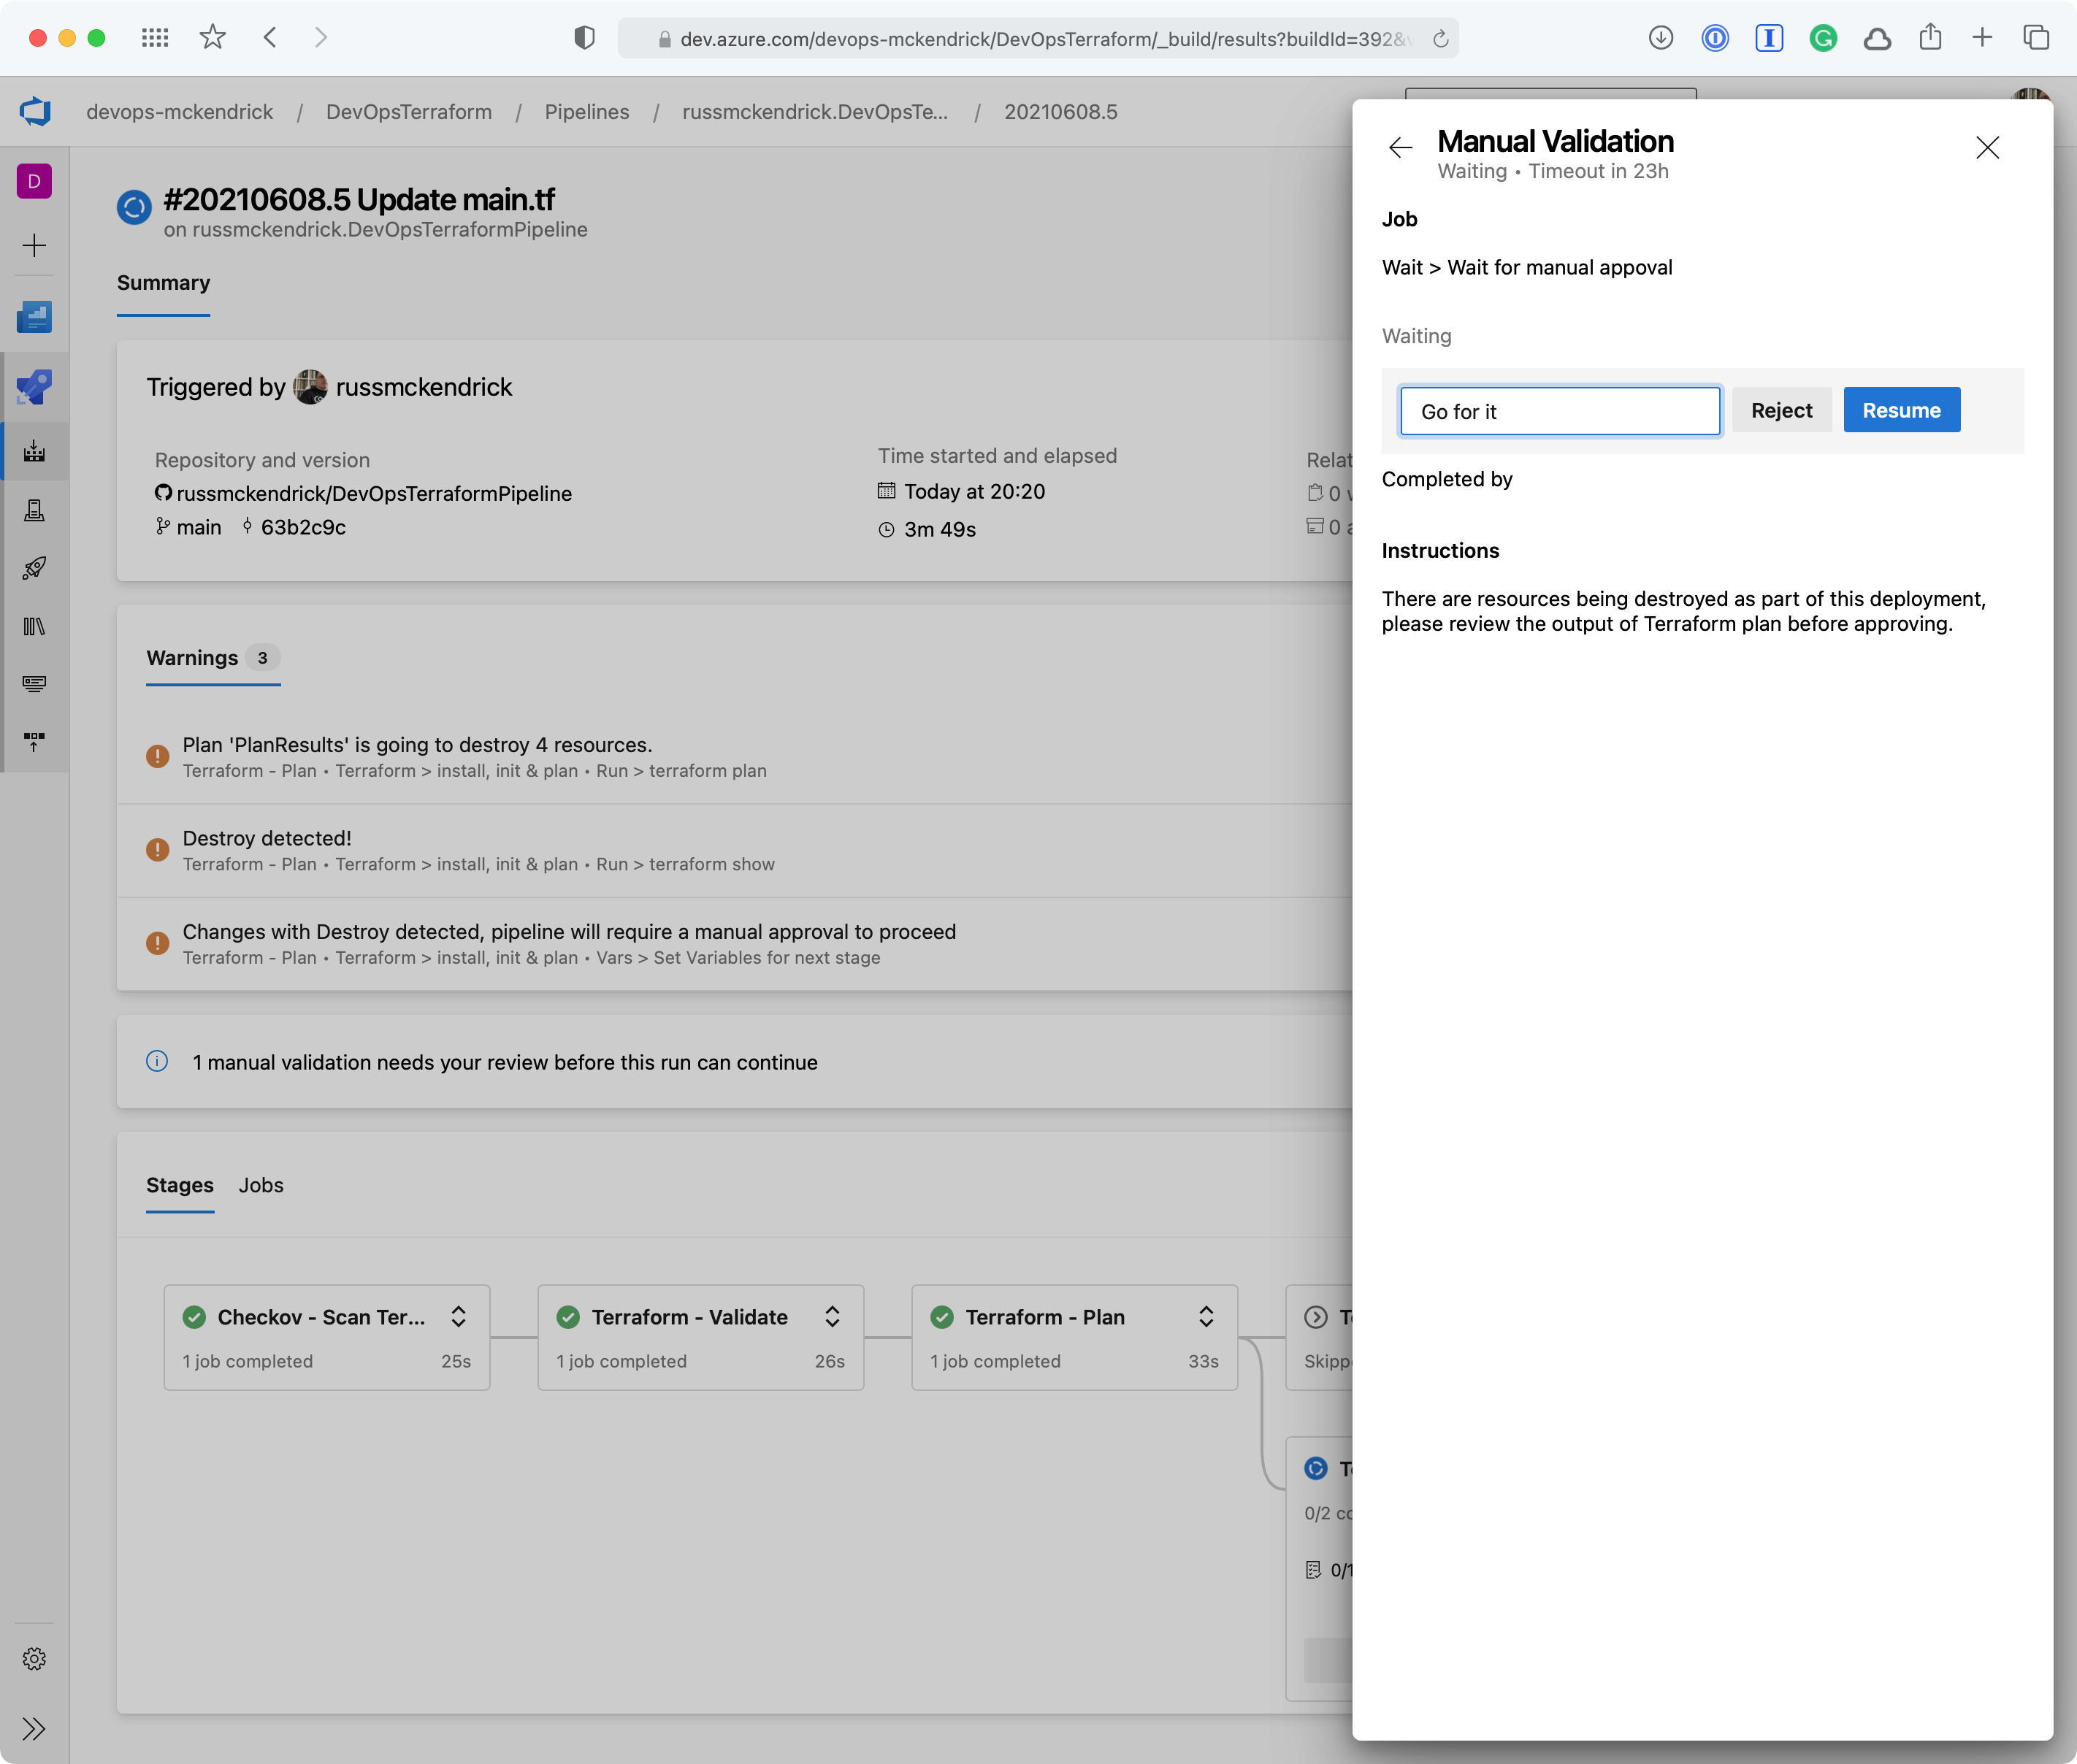
Reviewing and OK’ing the deployment {Source: MediaGlasses}
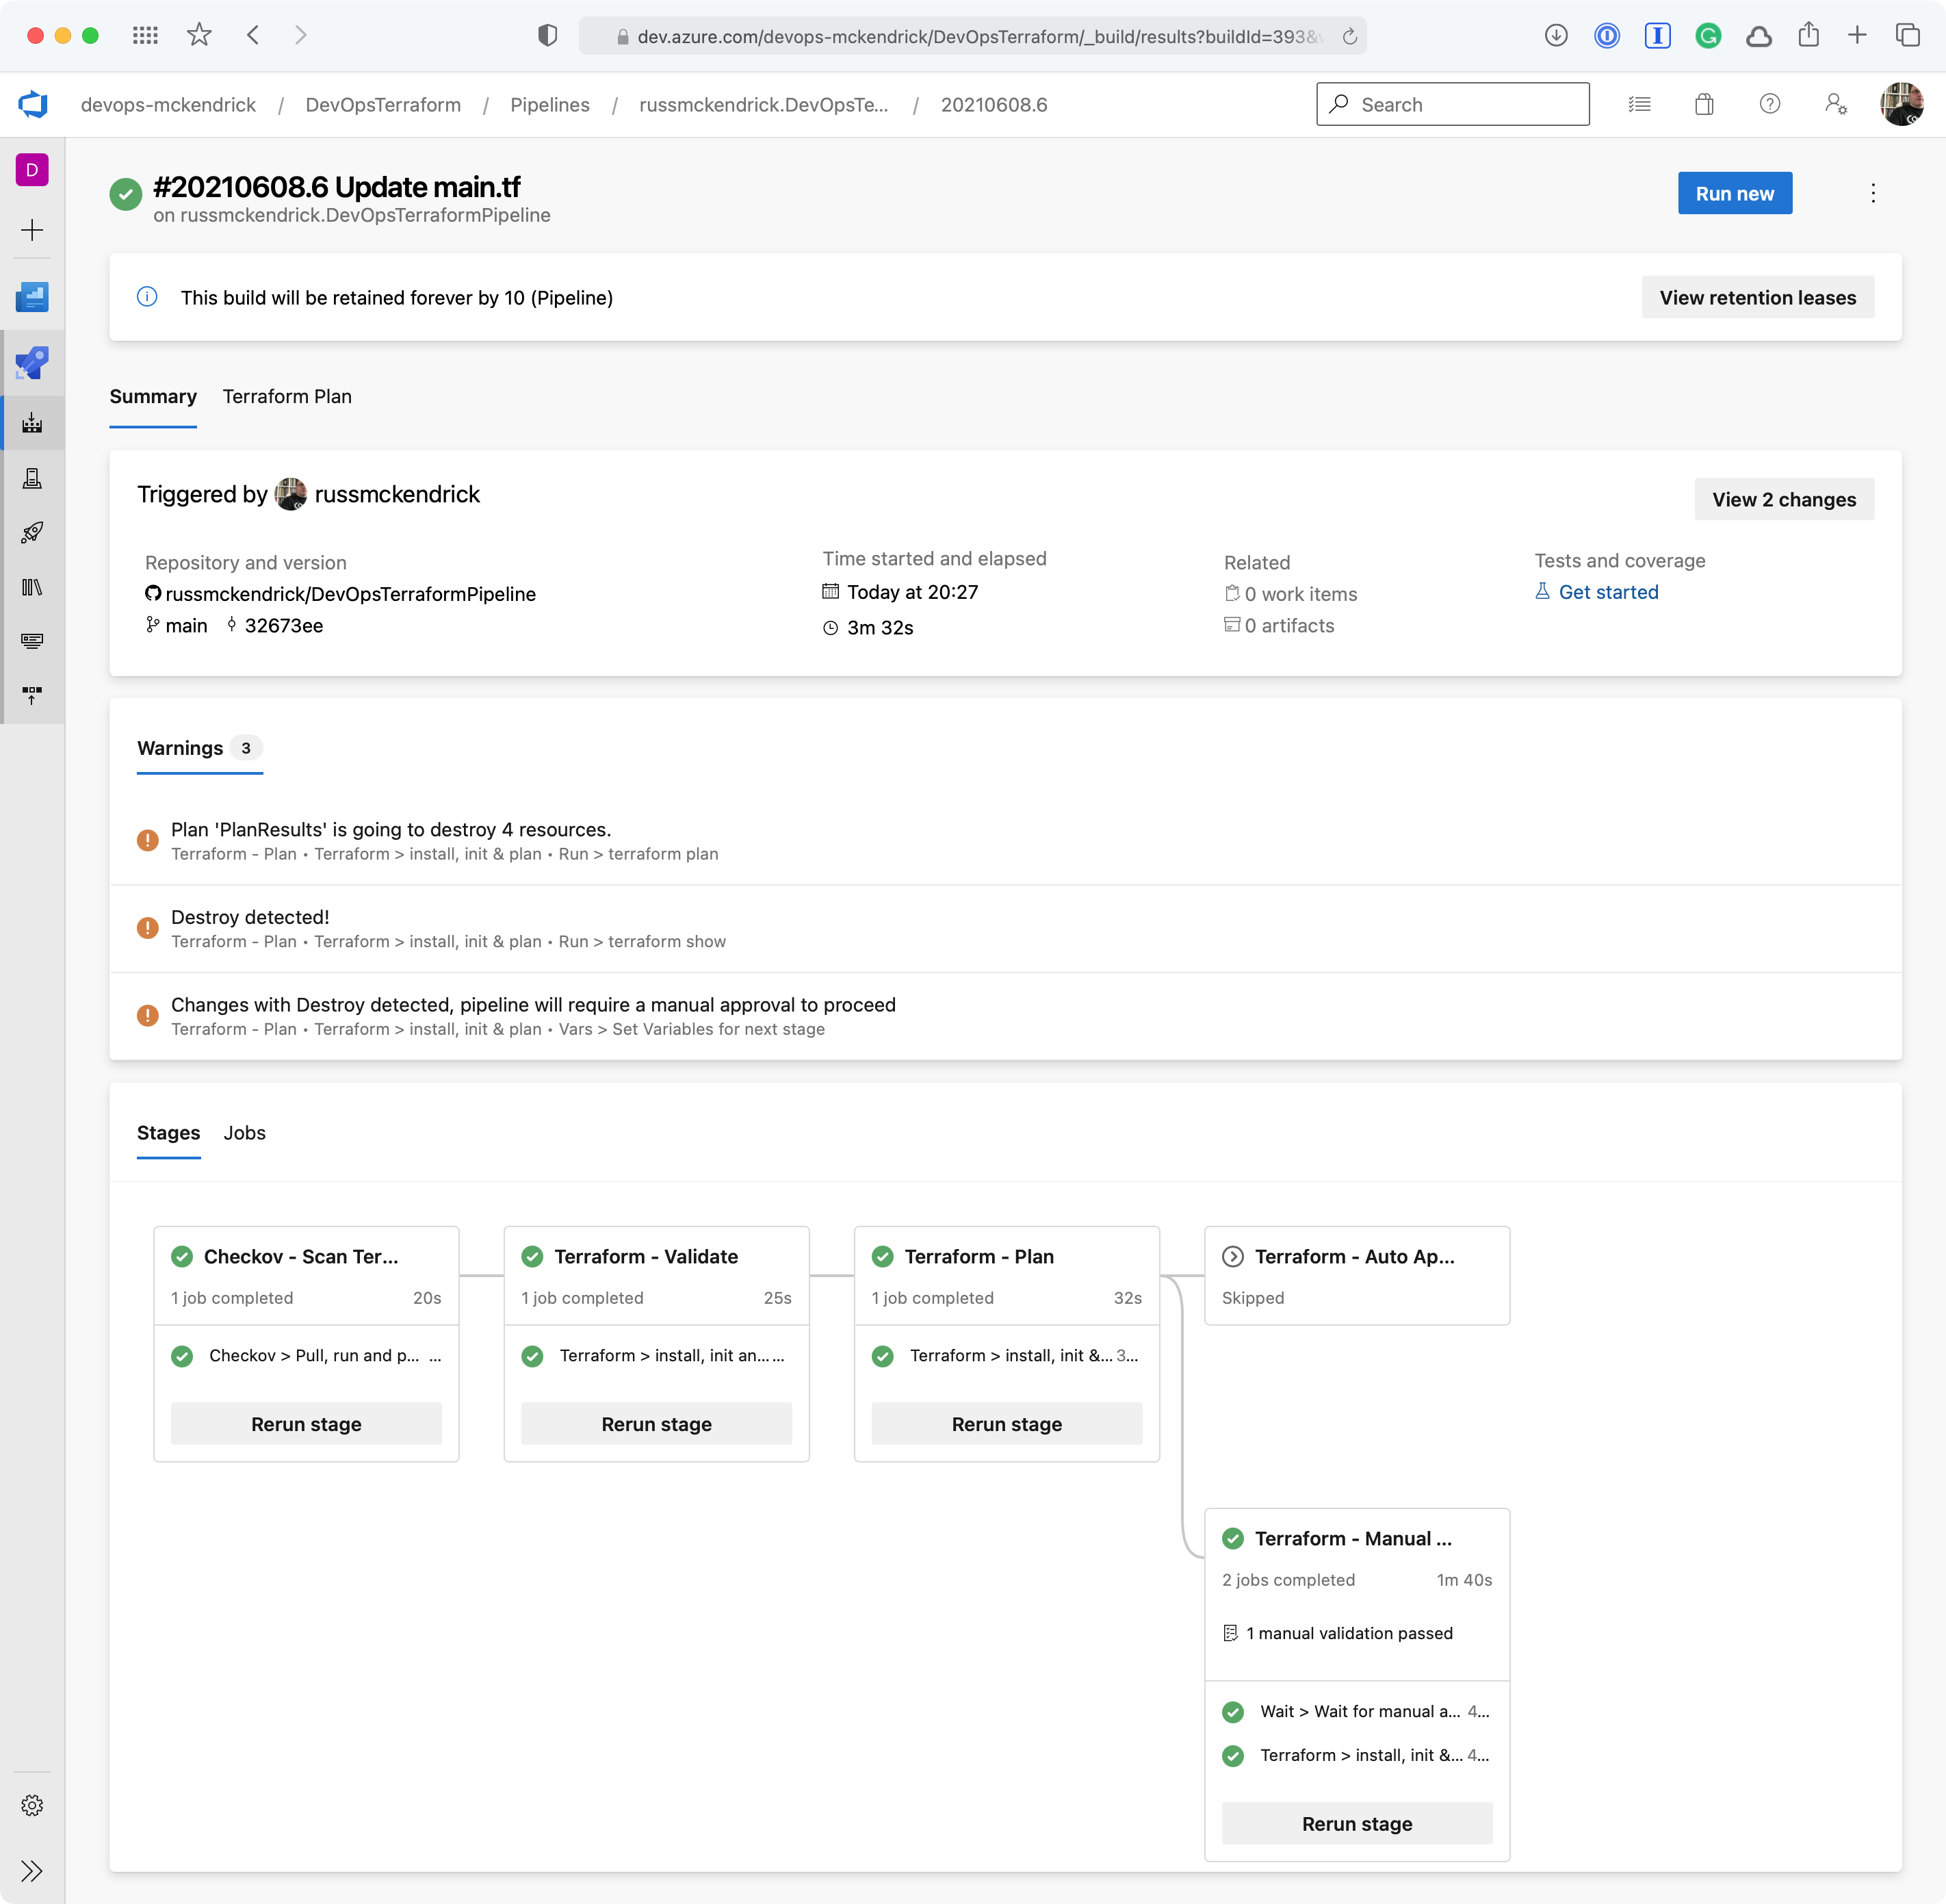
Once complete the network security group will have been destroyed, which is what we expected to happen, however, sometimes something unexpected may have happened and resources which you thought were not being touched by your changes maybe being destroyed so that they can be redeployed to make a change which isn’t possible any other way, this is where having your pipeline prompt you that it is going to remove resources comes in extremely useful 😊
Summary
As I find myself collaborating on more and more complex Terraform deployments it can get a little scary for all involved if you have a pipeline triggering automatically when you commit.
This means having checks in place which not only make sure that simple mistakes, like opening up management ports to the internet, but also to check that the code is valid before it gets executed is a good safety net.
An even bigger safety net is triggering the terraform apply command based on the results of a terraform plan so that checks can be made to ensure that nothing bad or unexpected is going to happen as a result of the changes you are applying —after all, stoping an outage before it becomes an outage is always the best option 👍
You can find the full pipeline along with the Terraform code at https://github.com/russmckendrick/DevOpsTerraformPipeline.
Further Insights

Got 2 minutes to spare to watch our Managed DevOps offering?

Do you require a DevOps Managed Service?
How Not to Screw Up Your Move to Azure

Russ McKendrick
Practice Manager (SRE & DevOps)
Russ heads up the SRE & DevOps team here at N4Stack.
He's spent almost 25 years working in IT and related industries and currently works exclusively with Linux.
When he's not out buying way too many records, Russ loves to write and has now published six books.
To find out more about Russ click here!